Bootstrapping a Nest.js Project on Ubuntu
This article is Part 1 in a 10 Part Series.
- Part 1 - This Article
- Part 2 - Create Nest.js Migrations
- Part 3 - Create Nest.js CRUD Resources
- Part 4 - Create Nest.js Seeders
- Part 5 - Create a Customer Module in Nest.js
- Part 6 - Nest.js Authentication
- Part 7 - Create a Products Module in Nest.js
- Part 8 - Create a Stripe Module in Nest.js
- Part 9 - Create an Orders Module in Nest.js
- Part 10 - End to End Tests for our Storefront Backend
Nest.js is a web framework used to build web applications that fully supports both Typescript and modern Javascript. It differs from other web frameworks such as Ruby on Rails or Laravel in that it doesn’t force a convention on you such as MVC (Model-View-Controller), which has its advantages and disadvantages. I have used Nest.js quite extensively in my previous employment as well as in side projects, and so far I have come to love using it with Typescript. One of the benefits is support for type checking and strong typing with Typescript - errors in your code are very quickly pointed out to you. Another is very fast execution thanks to the Node.js compilation, even for large projects like in my previous employment at Orteo. If you choose to go with Typescript, your code will be compiled to Javascript, and the framework uses either Express or Fastify as the application server under the hood.
While developing a node.js or Nest.js application locally, I would advise using a node.js version manager such as nvm. This has the benefit of allowing you to easily upgrade to new versions of node.js in future, while still maintaining support for your older projects. In production environments, I would advise adding the NodeSource PPA, then installing Node.js from their repository. For this tutorial, since we will be developing an API only e-commerce backend called storefont-backend , I will use the nvm method to install node.js. We will be installing the latest LTS version (16) at the time of writing. We will also be using Postgresql as our relational database, so we shall install it as well. We shall install Postgresql 14.
In case of any issues, you can refer to my Github repository here.
Install NVM, Node.js and NPM
Fetch nvm from Github.
curl -o- https://raw.githubusercontent.com/nvm-sh/nvm/v0.38.0/install.sh | bash
Reload your bash configuration.
source ~/.bashrc
Use nvm to check for the latest LTS versions of Node.js
nvm list-remote --lts
Output:
      v12.22.11   (LTS: Erbium)
      v12.22.12   (Latest LTS: Erbium)
       v14.15.0   (LTS: Fermium)
       v14.15.1   (LTS: Fermium)
       v14.15.2   (LTS: Fermium)
       v14.15.3   (LTS: Fermium)
       v14.15.4   (LTS: Fermium)
       v14.15.5   (LTS: Fermium)
       v14.16.0   (LTS: Fermium)
       v14.16.1   (LTS: Fermium)
       v14.17.0   (LTS: Fermium)
       v14.17.1   (LTS: Fermium)
       v14.17.2   (LTS: Fermium)
       v14.17.3   (LTS: Fermium)
       v14.17.4   (LTS: Fermium)
       v14.17.5   (LTS: Fermium)
       v14.17.6   (LTS: Fermium)
       v14.18.0   (LTS: Fermium)
       v14.18.1   (LTS: Fermium)
       v14.18.2   (LTS: Fermium)
       v14.18.3   (LTS: Fermium)
       v14.19.0   (LTS: Fermium)
       v14.19.1   (Latest LTS: Fermium)
       v16.13.0   (LTS: Gallium)
       v16.13.1   (LTS: Gallium)
       v16.13.2   (LTS: Gallium)
       v16.14.0   (LTS: Gallium)
       v16.14.1   (LTS: Gallium)
       v16.14.2   (Latest LTS: Gallium)
Install the latest Node.js LTS (version 16).
nvm install --lts=gallium
Set Node version 16 to be the default version used by the terminal.
nvm use v16.14.2
Confirm that Node is correctly installed.
node --version
Output:
v16.14.2
Confirm that NPM (Node package Manager) exists and is correctly installed.
npm --version
Output:
8.1.2
Install Postgresql
Since we want to use the latest version of Postgresql, we will have to add an external repository that’s maintained by the Postgresql team.
Add the external repository to your sources list:
sudo sh -c 'echo "deb http://apt.postgresql.org/pub/repos/apt $(lsb_release -cs)-pgdg main" > /etc/apt/sources.list.d/pgdg.list'
Add the GPG public key from the Postgresql team to verify the repository.
wget --quiet -O - https://www.postgresql.org/media/keys/ACCC4CF8.asc | sudo apt-key add -
Update your local repository.
sudo apt-get update
Install Postgresql version 14.
sudo apt-get -y install postgresql-14
Confirm that Postgresql is installed correctly.
sudo -u postgres psql -c "select version();"
Output:
                                                           version
-----------------------------------------------------------------------------------------------------------------------------
 PostgreSQL 14.2 (Ubuntu 14.2-1.pgdg21.04+1) on x86_64-pc-linux-gnu, compiled by gcc (Ubuntu 10.3.0-1ubuntu1) 10.3.0, 64-bit
(1 row)
Press q to exit from the postgresql terminal.
Install Git
Since the pre-installed Git that comes with Ubuntu/PopOS isn’t the latest one, we shall install the latest version from the PPA maintained by the Git core team.
Add the Git core team’s PPA to the sources list.
sudo add-apt-repository ppa:git-core/ppa
Update your local APT repository.
sudo apt update
Install the latest version of git.
sudo apt install git
Confirm that git is correctly installed.
git --version
Output:
git version 2.32.0
Install Nest.js CLI globally
The CLI (Command Line Interface) is a very handy utility that we will be using later on to create the main project, as well as to generate various resources required in the project e.g. modules, controllers and services. We are installing it globally so as to have the ability to call it anywhere in our file system without requiring an absolute path to the executable.
npm i -g @nestjs/cli
Confirm that the CLI is installed correctly.
nest --version
Output:
8.2.0
(Optional) Install VS-Code
Since my previous employment, VS-Code has become my preferred code editor. It has the benefits of being cross platform, a large community with vast language support as well as being quite user friendly. It’s not a requirement you use it for this tutorial, but you’re welcome to try it out (if you haven’t already).
Add the Microsoft public key to your local key cache.
wget -q https://packages.microsoft.com/keys/microsoft.asc -O- | sudo apt-key add -
Add the VS code repository from Microsoft.
sudo add-apt-repository "deb [arch=amd64] https://packages.microsoft.com/repos/vscode stable main"
Install VS code.
sudo apt install code
Confirm that VS code is installed correctly.
code --version
Output:
1.64.2
f80445acd5a3dadef24aa209168452a3d97cc326
x64
(Optional) Generate SSH Keys locally
In my local development environment, I prefer using SSH Keys over HTTP authentication, since with SSH I will not be always prompted for a username/password when interacting with a remote repository. This step is also optional. To setup SSH keys locally, you can follow the tutorial from Github here.
(Optional) Create a Github account and add SSH keys to Github
You can create a Github account by visiting their site here and clicking sign up. Then, in order to add your newly created SSH keys to Github, follow their tutorial here.
(Optional) Add Github account to VS-Code
Github has a VS-Code extension that makes creating Github repos, as well as pushing and pulling code from those repos a breeze. To install the extension, as well as to find out additional capabilities of said extension, follow the VS Code user guide here.
Create a projects directory (if you don’t have one already)
mkdir -p ~/Projects/nest_projects
cd ~/Projects/nest_projects
Create a new Nest.js project called storefront-backend
Note: I will be using npm as my preferred package manager.
nest new storefront-backend
Output:
⚡  We will scaffold your app in a few seconds..

CREATE storefront-backend/.eslintrc.js (631 bytes)
CREATE storefront-backend/.prettierrc (51 bytes)
CREATE storefront-backend/README.md (3339 bytes)
CREATE storefront-backend/nest-cli.json (64 bytes)
CREATE storefront-backend/package.json (2007 bytes)
CREATE storefront-backend/tsconfig.build.json (97 bytes)
CREATE storefront-backend/tsconfig.json (546 bytes)
CREATE storefront-backend/src/app.controller.spec.ts (617 bytes)
CREATE storefront-backend/src/app.controller.ts (274 bytes)
CREATE storefront-backend/src/app.module.ts (249 bytes)
CREATE storefront-backend/src/app.service.ts (142 bytes)
CREATE storefront-backend/src/main.ts (208 bytes)
CREATE storefront-backend/test/app.e2e-spec.ts (630 bytes)
CREATE storefront-backend/test/jest-e2e.json (183 bytes)

? Which package manager would you ❤️  to use? npm
✔ Installation in progress... ☕

🚀  Successfully created project storefront-backend
👉  Get started with the following commands:

$ cd storefront-backend
$ npm run start

                                          Thanks for installing Nest 🙏
                                 Please consider donating to our open collective
                                        to help us maintain this package.


                               🍷  Donate: https://opencollective.com/nest
On a different terminal tab, navigate to the newly generated Nest.js project
cd ~/Projects/nest_projects/storefront-backend/
Run the project, and autoload any changes made to the project
npm run start:dev
(Optional) Update Nest.js to the latest version (8.2.4 at the time of writing)
Note: Don’t try this on an old Nest.js project as it will install breaking changes
nest u -f -t latest
The above command will force install the latest version of Nest.js and ignore any breaking changes between dependencies.
Confirm that the latest version of Nest.js is installed
nest info
Output:
 _   _             _      ___  _____  _____  _     _____
| \ | |           | |    |_|/  ___|/__ \| |   |__|
|  \| |  ______ | |_| |\ `--. | /  \/| |     | |
| . ` | /_ \/ __||__|    | | `--. \| |    | |     | |
| |\  ||  __/\__ \| |_ /\__/ //\__/ /| \__/\| |_____| |_
\_| \_/ \_**||**_/ \__|\____/ \____/  \____/\_____/\___/

[System Information]
OS Version     : Linux 5.15
NodeJS Version : v16.13.1
NPM Version    : 8.1.2

[Nest CLI]
Nest CLI Version : 8.2.4

[Nest Platform Information]
platform-express version : 8.4.3
schematics version       : 8.0.8
testing version          : 8.4.3
common version           : 8.4.3
core version             : 8.4.3
cli version              : 8.2.4
Confirm that the server is running and printing logs on the console
npm run start:dev
Output:
[4:22:52 PM] Starting compilation in watch mode...

[4:22:53 PM] Found 0 errors. Watching for file changes.

[Nest] 153346  - 03/29/2022, 4:22:53 PM     LOG [NestFactory] Starting Nest application...
[Nest] 153346  - 03/29/2022, 4:22:53 PM     LOG [InstanceLoader] AppModule dependencies initialized +17ms
[Nest] 153346  - 03/29/2022, 4:22:53 PM     LOG [RoutesResolver] AppController {/}: +3ms
[Nest] 153346  - 03/29/2022, 4:22:53 PM     LOG [RouterExplorer] Mapped {/, GET} route +2ms
[Nest] 153346  - 03/29/2022, 4:22:53 PM     LOG [NestApplication] Nest application successfully started +1ms
If you navigate to http://localhost:3000 on your web browser you should see something like this:
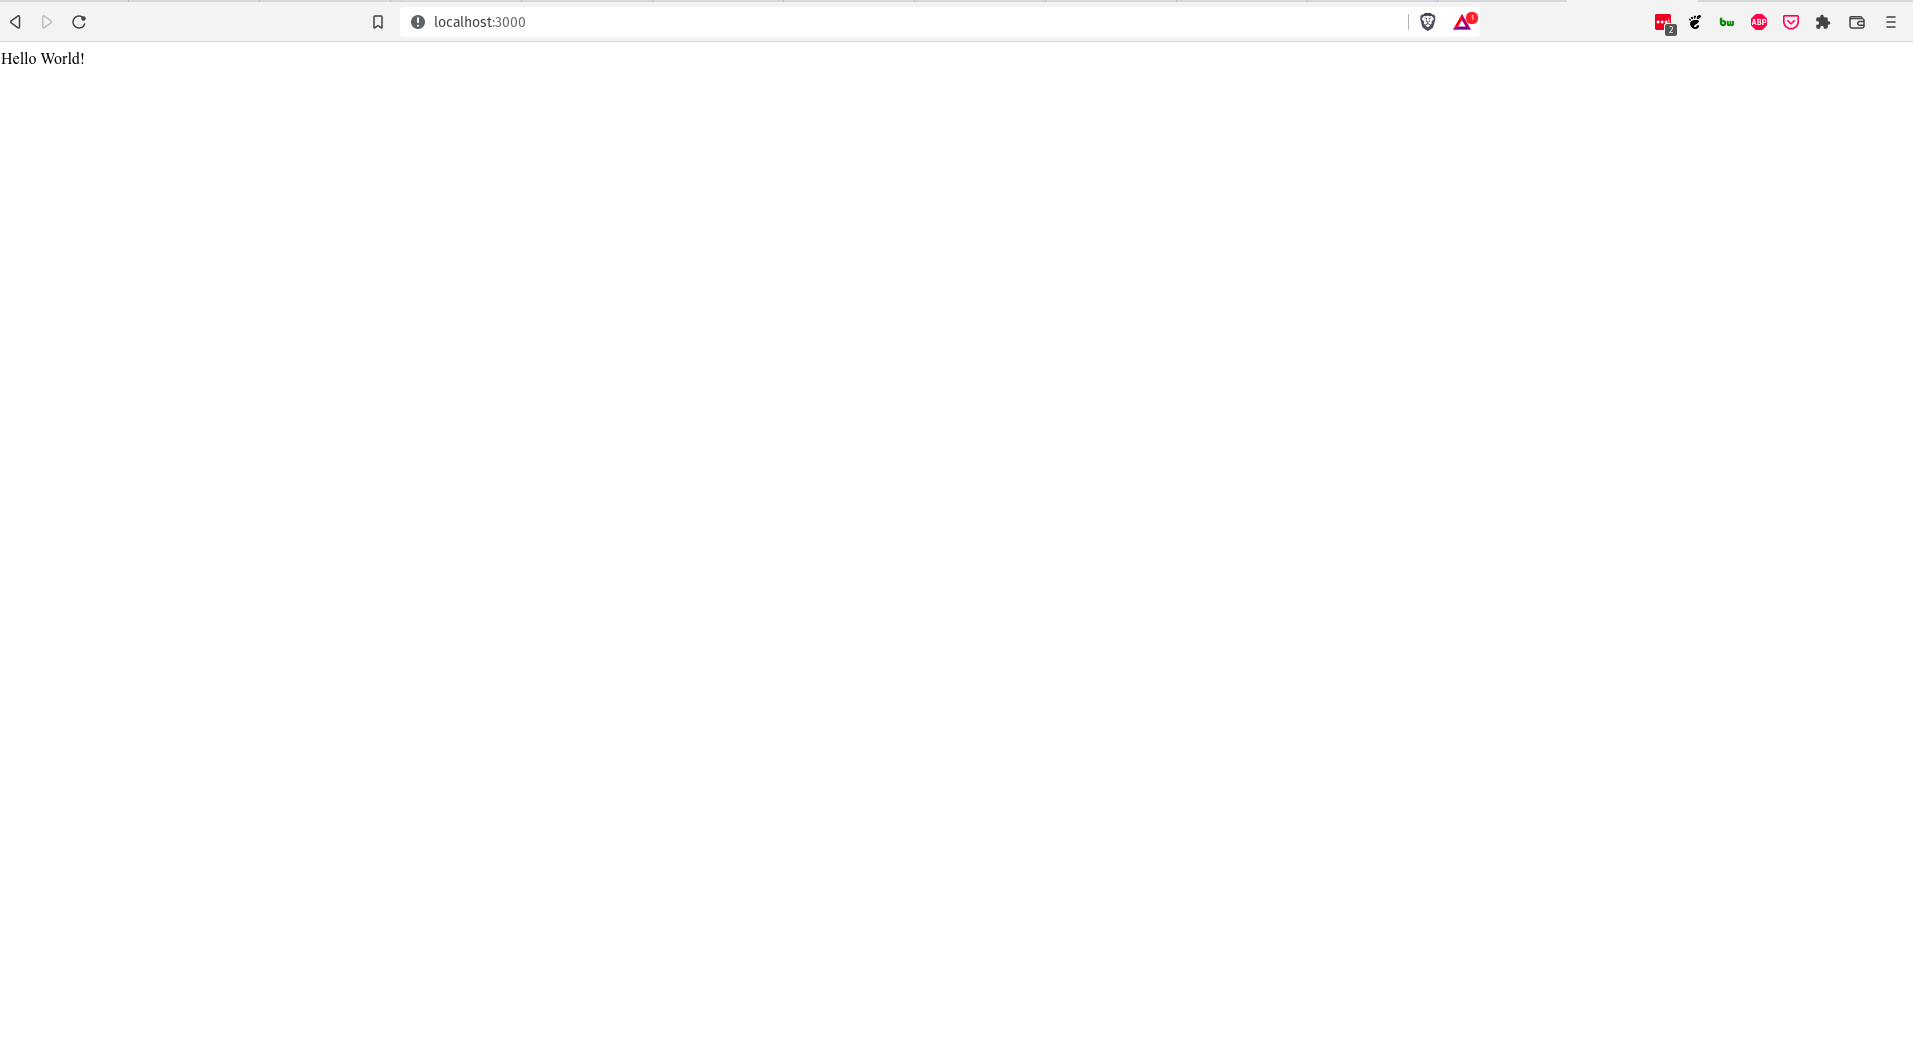
A Hello World message is displayed on the browser.
Create a development branch using git on the project
git co -b development
Output:
Switched to a new branch 'development'
Add the newly generated files and commit them
git add .
git ci -m "Initial commit"
Output:
[development (root-commit) 215a757] Initial commit
 16 files changed, 15809 insertions(+)
 create mode 100644 .eslintrc.js
 create mode 100644 .gitignore
 create mode 100644 .prettierrc
 create mode 100644 README.md
 create mode 100644 nest-cli.json
 create mode 100644 package-lock.json
 create mode 100644 package.json
 create mode 100644 src/app.controller.spec.ts
 create mode 100644 src/app.controller.ts
 create mode 100644 src/app.module.ts
 create mode 100644 src/app.service.ts
 create mode 100644 src/main.ts
 create mode 100644 test/app.e2e-spec.ts
 create mode 100644 test/jest-e2e.json
 create mode 100644 tsconfig.build.json
 create mode 100644 tsconfig.json
(Optional) Use VS-Code to publish project to public/private Github Repository
VS-Code will use the added Github account to push code to your Github repo. You should see something similar to the graphic below:
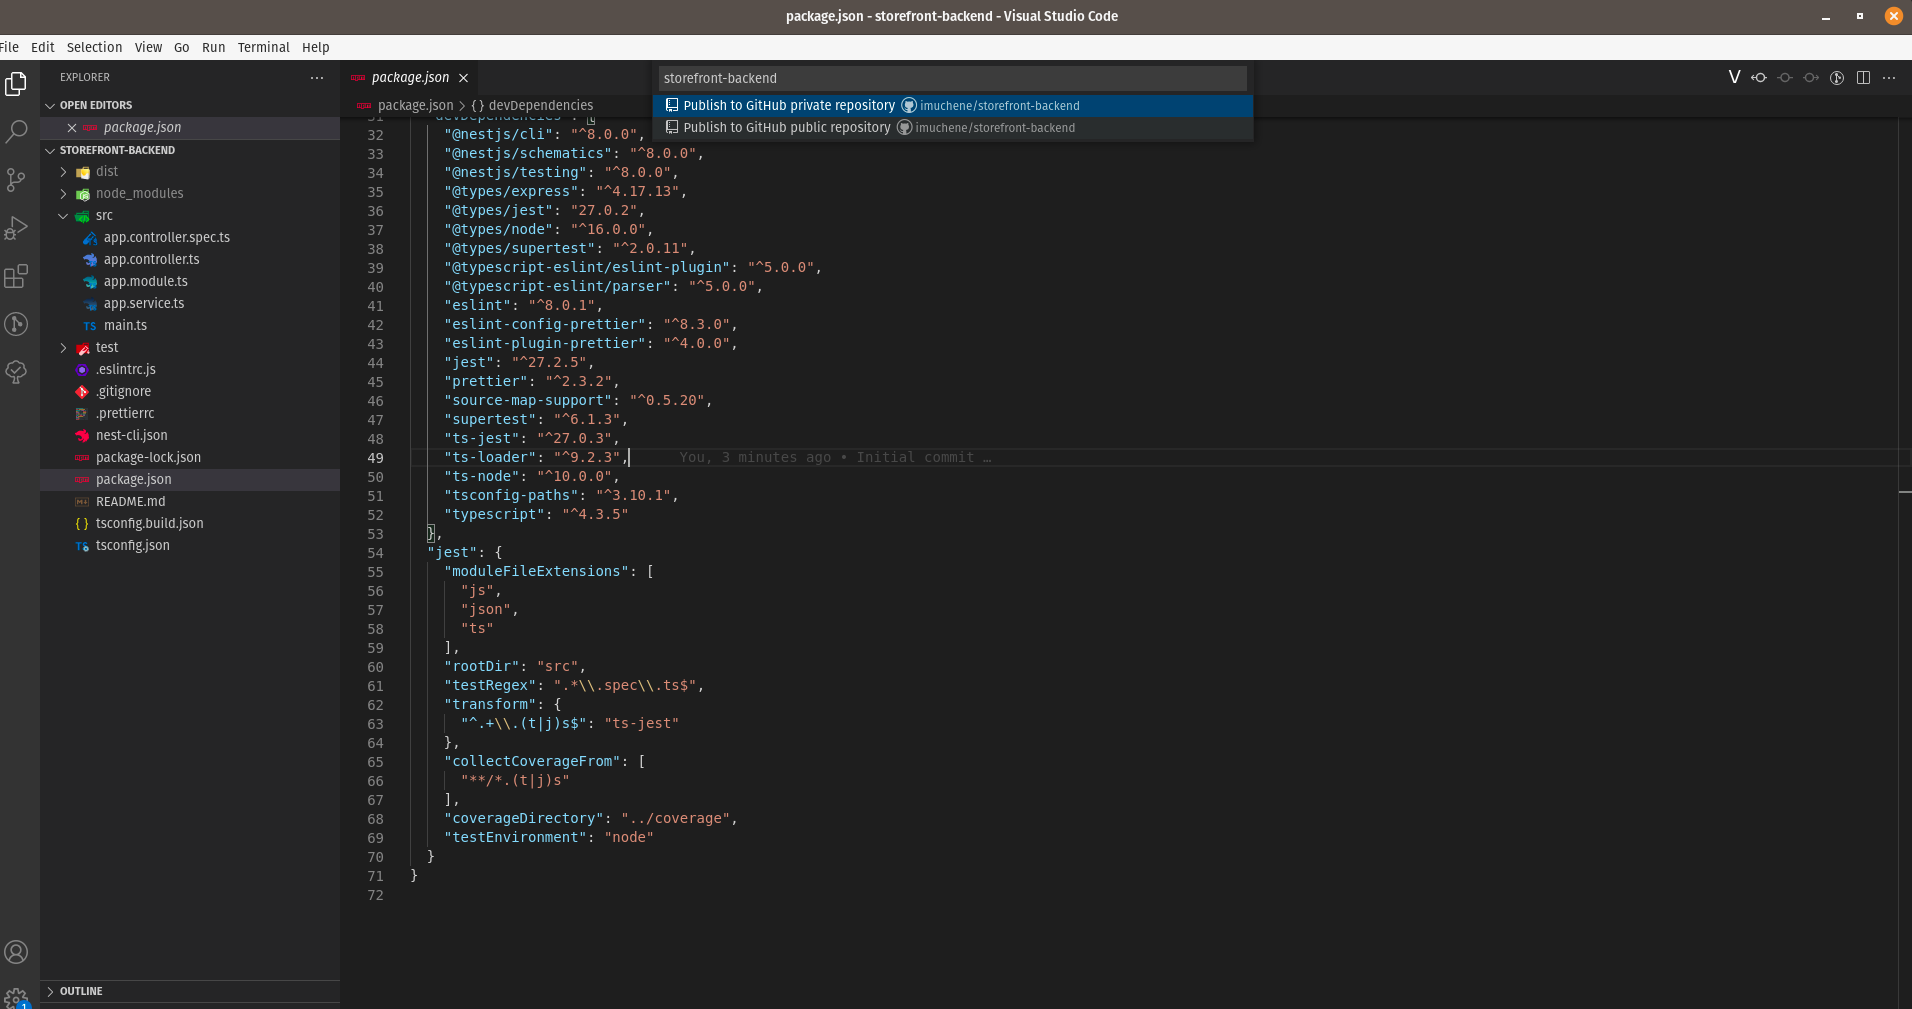
It’s your choice as to whether you want your repo to be public or private. Regardless, the repo will be automatically created and your initial commit will appear on Github.