Nest.js Authentication
This article is Part 6 in a 10 Part Series.
- Part 1 - Bootstrapping a Nest.js Project on Ubuntu
- Part 2 - Create Nest.js Migrations
- Part 3 - Create Nest.js CRUD Resources
- Part 4 - Create Nest.js Seeders
- Part 5 - Create a Customer Module in Nest.js
- Part 6 - This Article
- Part 7 - Create a Products Module in Nest.js
- Part 8 - Create a Stripe Module in Nest.js
- Part 9 - Create an Orders Module in Nest.js
- Part 10 - End to End Tests for our Storefront Backend
Continuing with the series, in this iteration of the tutorial we shall be focusing on implementing a way to keep track of our customers, as well as some basic security for our application. For starters, we shall add functionality for registering customers, logging them in as well as logging them out. We will need this as each order in our database will be attached to a single customer. All the above functionality will be contained within an application module.
In the typescript/javascript world, the most popular method for authenticating users of a system is through JWT authentication. In this method, once a user successfully logs in to the application, a JWT authentication token is sent to the user’s browser via a cookie in the server response. This token is usually valid for a short period of time, and the user can utilise it to make subsequent requests to access protected resources on the application.
In case of any issues, you can refer to my Github repository here.
Authentication Flow
Here’s a sequence diagram of our authentication flow, from registration to login to logout:
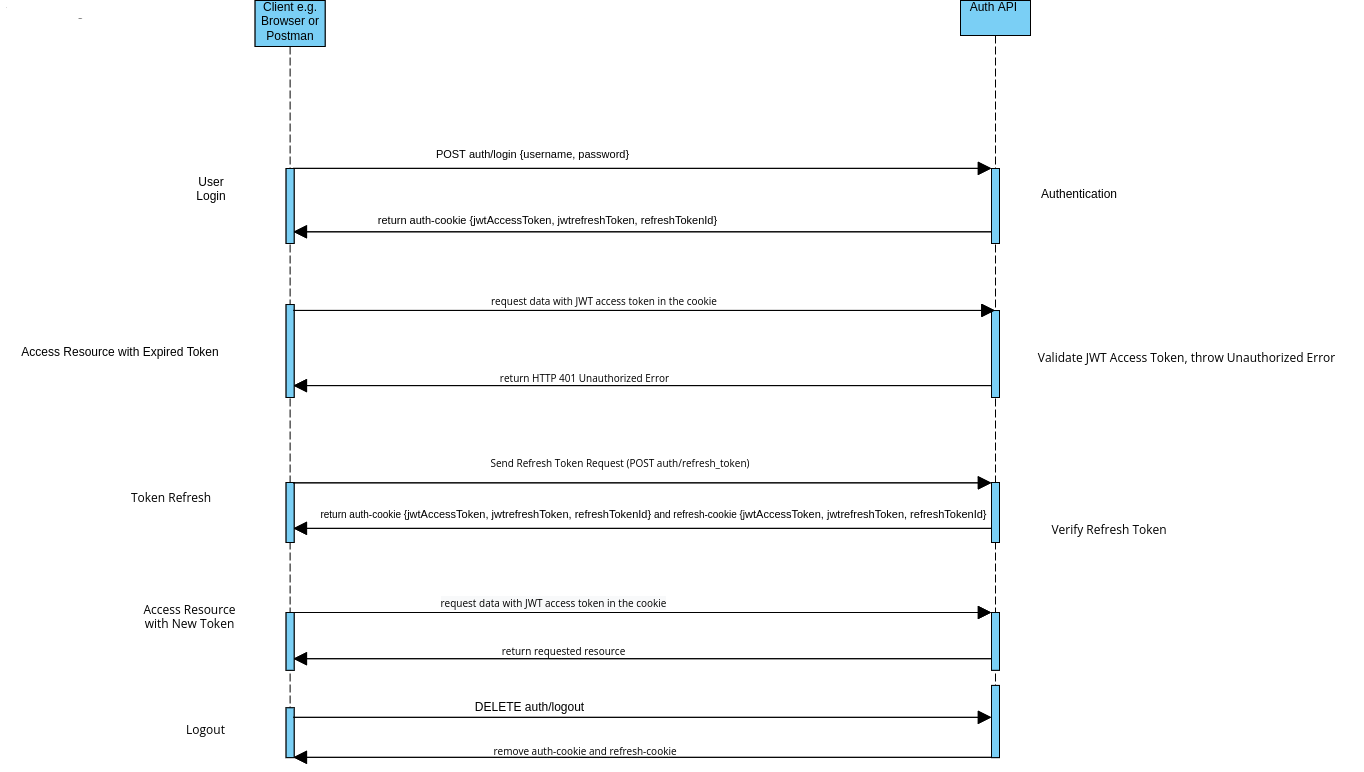
It might look intimidating at first, but we shall tackle all the various stages above step by step.
Install Redis
We’ll be using redis to store our refresh tokens (until the user logs out). We will therefore need to install it first. Here’s how to do so on Ubuntu:
sudo apt install redis-server
It is strongly recommended to secure redis post installation by enforcing authentication. In order to so, check out the tutorial here, as well as the first comment in the tutorial.
Install Install bcrypt
npm i @types/bcrypt bcrypt --save
Install passport and JWT
npm i @nestjs/passport @nestjs/jwt passport passport-local @types/passport-local passport-jwt @types/express @types/passport-jwt --save
In order to secure our JWT tokens from being tampered with, we shall create two RSA keypairs to sign our JWT tokens, which is the approach recommended by the Nest.js core developers.
Generate JWT Access Token keypairs
Within the project root, run to create the keys directory:
mkdir rsa-keys && cd rsa-keys
Use the ssh-keygen command to generate a 4096 bit RSA private key in the PEM format. You can press enter to skip entering a passphrase:
ssh-keygen -t rsa -b 4096 -m PEM -f jwtRS256.key
Use the openssl command to generate a correspoding RSA public key also in PEM format using the previously generated private key as an input:
openssl rsa -in jwtRS256.key -pubout -outform PEM -out jwtRS256.key.pub
Check if the private key has been successfully created by printing it out to the console:
cat jwtRS256.key
Check if the public key has been successfully created by printing it out to the console:
cat jwtRS256.key.pub
Rename the private key to a more memorable name:
mv -v jwtRS256.key access-token-private-key.key
Rename the public key to a more memorable name:
mv -v jwtRS256.key.pub access-token-public-key.pub
Clear the console:
clear
This last step is recommended since you would not want an attacker being able to view a copy of your keys via the terminal.
Generate JWT Refresh Token keypairs
Repeat the same steps as above when creating the access token keypairs in order to create the refresh token keypairs Within the same directory. This time rename the outputted files to refresh-token-private-key and refresh-token-public-key respectively:
cd rsa-keys
ssh-keygen -t rsa -b 4096 -m PEM -f jwtRS256.key
openssl rsa -in jwtRS256.key -pubout -outform PEM -out jwtRS256.key.pub
cat jwtRS256.key
cat jwtRS256.key.pub
mv -v jwtRS256.key refresh-token-private-key.key
mv -v jwtRS256.key.pub refresh-token-public-key.pub
Clear the console:
clear
This last step is recommended since you would not want an attacker being able to view a copy of your keys via the terminal.
Add new configuration to auth module
Here is how my updated auth.module file looks like. I have imported the JwtModule from @nestjs/jwt, ConfigModule and ConfigService from @nestjs/config, CustomersModule (that we previously created) as well as the fs utility (in order to access files in our local filesystem). I also created and imported some strategy files which I will include shortly.
import { Module } from '@nestjs/common';
import { AuthService } from './auth.service';
import { AuthController } from './auth.controller';
import { CustomersModule } from '../customers/customers.module';
import { JwtModule } from '@nestjs/jwt';
import { ConfigModule, ConfigService } from '@nestjs/config';
import { JwtStrategy } from './strategies/jwt.strategy';
import { LocalStrategy } from './strategies/local.strategy';
import { RefreshStrategy } from './strategies/refresh.strategy';
import * as fs from 'fs';

@Module({
  imports: [
    CustomersModule,
    JwtModule.registerAsync({
      imports: [ConfigModule],
      inject: [ConfigService],
      useFactory: async (configService: ConfigService) => ({
        privateKey: fs
          .readFileSync(
            configService.get<string>('JWT_ACCESS_TOKEN_PRIVATE_KEY'),
          )
          .toString(),
        publicKey: fs
          .readFileSync(
            configService.get<string>('JWT_ACCESS_TOKEN_PUBLIC_KEY'),
          )
          .toString(),
        signOptions: {
          expiresIn: configService.get<string>(
            'JWT_ACCESS_TOKEN_EXPIRATION_TIME',
          ),
          algorithm: 'RS256',
        },
      }),
    }),
  ],
  providers: [AuthService, JwtStrategy, LocalStrategy, RefreshStrategy],
  controllers: [AuthController],
})
export class AuthModule {}
Update Secrets File
Don’t forget to add the references to the RSA keys generated above to your secrets file (.env), as well as the redis configuration.
# Access Token Secrets
JWT_ACCESS_TOKEN_PUBLIC_KEY='rsa-keys/access-token-public-key.pub'
JWT_ACCESS_TOKEN_PRIVATE_KEY='rsa-keys/access-token-private-key.key'
JWT_ACCESS_TOKEN_EXPIRATION_TIME=600s

# Cookie Secret
COOKIE_SECRET=thisisateststringforcookies

# Redis Configuration
REDIS_HOST=localhost
REDIS_PORT=6379
REDIS_DB=0
REDIS_USERNAME=your_redis_username
REDIS_PASSWORD=your_redis_password
REDIS_PREFIX='development:'

# Refresh Token Secrets
JWT_REFRESH_TOKEN_PUBLIC_KEY='rsa-keys/refresh-token-public-key.pub'
JWT_REFRESH_TOKEN_PRIVATE_KEY='rsa-keys/refresh-token-private-key.key'
JWT_REFRESH_TOKEN_EXPIRATION_TIME=600s
Update and validate environment variables
Don’t forget to also update and validate your environment variables:
@IsString()
JWT_ACCESS_TOKEN_EXPIRATION_TIME: string;

@IsString()
COOKIE_SECRET: string;

@IsString()
REDIS_HOST: string;

@IsNumber()
REDIS_PORT: number;

@IsNumber()
REDIS_DB: number;

@IsString()
REDIS_USERNAME: string;

@IsString()
REDIS_PASSWORD: string;

@IsString()
REDIS_PREFIX: string;

@IsString()
JWT_REFRESH_TOKEN_EXPIRATION_TIME: string;

@IsString()
JWT_ACCESS_TOKEN_PUBLIC_KEY: string;

@IsString()
JWT_ACCESS_TOKEN_PRIVATE_KEY: string;

@IsString()
JWT_REFRESH_TOKEN_PUBLIC_KEY: string;

@IsString()
JWT_REFRESH_TOKEN_PRIVATE_KEY: string;
Add Cookie Secrets to the main.ts file
Install the cookie parser package:
npm i cookie-parser && npm i --save-dev @types/cookie-parser
Since we’ll be signing our cookies to prevent them from being tampered with, we’ll have to add a signing key as a parameter to cookie parser in our main.ts file:
import { ValidationPipe } from '@nestjs/common';
import { ConfigService } from '@nestjs/config';
import { NestFactory } from '@nestjs/core';
import { AppModule } from './app.module';
import * as cookieParser from 'cookie-parser';

async function bootstrap() {
  const app = await NestFactory.create(AppModule);
  app.useGlobalPipes(new ValidationPipe());
  const configService = app.get(ConfigService);
  const port = configService.get('PORT');
  app.use(cookieParser(configService.get('COOKIE_SECRET')));
  await app.listen(port);
}
bootstrap();
Strategies
In the Typescript and Node.js world, authentication is done by means of strategies. Since Nest.js doesn’t enforce any default authentication strategy, we will have to implement one for ourseleves from scratch. In order to do so, we will be using the passport module, which we had added earlier on in our project. We will be creating three different strategies to handle authentication in our application: local, refresh and JWT.
The local strategy:
import { Injectable } from '@nestjs/common';
import { PassportStrategy } from '@nestjs/passport';
import { Strategy } from 'passport-local';
import { Customer } from '../../customers/entities/customer.entity';
import { AuthService } from '../auth.service';

@Injectable()
export class LocalStrategy extends PassportStrategy(Strategy, 'local') {
  constructor(private readonly authService: AuthService) {
    super({
      usernameField: 'email',
    });
  }

  async validate(email: string, password: string): Promise<Customer> {
    return await this.authService.getAuthenticatedCustomer(email, password);
  }
}
This strategy extends from the parent PassportStrategy, and it directs the passport module on what to do once a user supplies us with a username/password combination. By default, the local stategy expects a username/password combination, but we instead direct it to anticipate an email field in place of a username. Next, in order to validate our customer, we direct it to the getAuthenticatedCustomer method in our AuthService.
The JWT strategy:
import { Injectable, UnauthorizedException } from '@nestjs/common';
import { ConfigService } from '@nestjs/config';
import { PassportStrategy } from '@nestjs/passport';
import { ExtractJwt, Strategy } from 'passport-jwt';
import { CustomersService } from '../../customers/customers.service';
import { Request } from 'express';
import { JwtTokenPayload } from '../interfaces/jwt-payload.interface';
import { Customer } from '../../customers/entities/customer.entity';
import { SecretData } from '../interfaces/secret-data.interface';
import * as fs from 'fs';

@Injectable()
export class JwtStrategy extends PassportStrategy(Strategy, 'jwt') {
  constructor(
    private readonly customersService: CustomersService,
    readonly configService: ConfigService,
  ) {
    super({
      jwtFromRequest: ExtractJwt.fromExtractors([
        (request: Request) => {
          const data: SecretData = request?.signedCookies['auth-cookie'];
          if (!data) {
            return null;
          }
          return data.jwtAccessToken;
        },
      ]),
      secretOrKey: fs
        .readFileSync(configService.get<string>('JWT_ACCESS_TOKEN_PUBLIC_KEY'))
        .toString(),

      ignoreExpiration: false,
    });
  }

  async validate(payload: JwtTokenPayload): Promise<Customer> {
    if (payload === null) {
      throw new UnauthorizedException();
    }
    return await this.customersService.getById(payload.customerId);
  }
}
This strategy directs our application on how to validate JWT tokens - which the API will be sending and receiving by means of signed cookies. First, the JWT token will be fetched from the cookie through the ExtractJwt library. We will be using the public key that we created previously to decode the JWT access token. By default, the passport module will return a 401 Unauthorized error if a JWT token is expired/invalid, and it will do this behind the scenes. In the validate method, we instruct passport to return a customer object in the event the JWT token received via the cookie is valid. In the event no token exists, to throw an unauthorized exception.
The Refresh strategy:
This strategy will be used to validate refresh tokens. It is very similar to the JWT strategy, however, with a few differences:
import { BadRequestException, Injectable, Logger } from '@nestjs/common';
import { ConfigService } from '@nestjs/config';
import { PassportStrategy } from '@nestjs/passport';
import { ExtractJwt, Strategy } from 'passport-jwt';
import { Request } from 'express';
import { SecretData } from '../interfaces/secret-data.interface';
import { AuthService } from '../auth.service';
import { Customer } from '../../customers/entities/customer.entity';
import { JwtTokenPayload } from '../interfaces/jwt-payload.interface';
import * as fs from 'fs';

@Injectable()
export class RefreshStrategy extends PassportStrategy(Strategy, 'refresh') {
  constructor(
    readonly configService: ConfigService,
    private readonly authService: AuthService,
  ) {
    super({
      ignoreExpiration: true,
      passReqToCallback: true,
      secretOrKey: fs
        .readFileSync(configService.get<string>('JWT_REFRESH_TOKEN_PUBLIC_KEY'))
        .toString(),
      jwtFromRequest: ExtractJwt.fromExtractors([
        (request: Request) => {
          const data: SecretData = request?.signedCookies['auth-cookie'];
          if (!data) {
            return null;
          }
          return data.jwtRefreshToken;
        },
      ]),
    });
  }

  async validate(req: Request, payload: JwtTokenPayload): Promise<Customer> {
    if (!payload) {
      throw new BadRequestException('no token payload');
    }
    const data: SecretData = req?.signedCookies['auth-cookie'];

    if (!data.jwtRefreshToken) {
      throw new BadRequestException('invalid refresh token');
    }
    const customer = await this.authService.validateJwtRefreshToken(
      payload.customerId,
      data.jwtRefreshToken,
      data.refreshTokenId,
    );
    if (!customer) {
      throw new BadRequestException('token expired');
    }
    return customer;
  }
}
Since we don’t intend to expire our refresh tokens, we tell the Passport to ignore the expiry of our JWT tokens. To avoid errors when parsing a refresh token from a cookie such as the error below:
[Nest] 284242  - 06/27/2022, 4:45:16 PM   ERROR [ExceptionsHandler] Cannot read properties of undefined (reading 'auth-cookie')
TypeError: Cannot read properties of undefined (reading 'auth-cookie')
    at RefreshStrategy.validate (/home/isaiah/Projects/nest_projects/storefront-backend/src/modules/auth/strategies/refresh.strategy.ts:40:48)
    at RefreshStrategy.<anonymous> (/home/isaiah/Projects/nest_projects/storefront-backend/node_modules/@nestjs/passport/dist/passport/passport.strategy.js:20:55)
    at Generator.next (<anonymous>)
    at /home/isaiah/Projects/nest_projects/storefront-backend/node_modules/@nestjs/passport/dist/passport/passport.strategy.js:8:71
    at new Promise (<anonymous>)
    at __awaiter (/home/isaiah/Projects/nest_projects/storefront-backend/node_modules/@nestjs/passport/dist/passport/passport.strategy.js:4:12)
    at RefreshStrategy.callback [as _verify] (/home/isaiah/Projects/nest_projects/storefront-backend/node_modules/@nestjs/passport/dist/passport/passport.strategy.js:17:45)
    at /home/isaiah/Projects/nest_projects/storefront-backend/node_modules/passport-jwt/lib/strategy.js:123:34
    at /home/isaiah/Projects/nest_projects/storefront-backend/node_modules/jsonwebtoken/verify.js:223:12
    at getSecret (/home/isaiah/Projects/nest_projects/storefront-backend/node_modules/jsonwebtoken/verify.js:90:14)
We have to set passReqCallback to true. In a similar fashion to the JWT strategy, we use the refresh token public key to decrypt the token. Lastly, we extract the refresh token from the cookie and return it as a parameter.
Here are the authentication interfaces:
The Jwt payload interface the data that is returned once a JWT Access/Refresh token is decrypted.
export interface JwtTokenPayload {
  customerId: string;
}
The secret data interface represents the data that will be encoded within the signed cookie.
export interface SecretData {
  jwtAccessToken: string;
  jwtRefreshToken: string;
  refreshTokenId: string;
}
Authentication Guards
We will also be implementing guards, which are special classes that Nest.js uses to limit access to endpoints/routes in our application. They are the recommended method for performing authorization. I have created a jwt-auth guard, which we will be using later on to limit access to certain endpoints to logged in users, and a refresh-auth guard, which can only be accessed via a valid refresh token. Both the guards extend the AuthGuard parent class that comes with Nest.js.
Jwt Auth Guard:
import { Injectable } from '@nestjs/common';
import { AuthGuard } from '@nestjs/passport';

@Injectable()
export class JwtAuthGuard extends AuthGuard('jwt') {}
Refresh Guard:
import { Injectable } from '@nestjs/common';
import { AuthGuard } from '@nestjs/passport';

@Injectable()
export class RefreshGuard extends AuthGuard('refresh') {}
Auth Service
We will be implementing most of the actual authentication logic in the auth service. Since we will be using redis as a temporary cache for our refresh tokens, where they will be automatically exipred after one day, we will need to install te nestjs-redis node module so as to interface with redis:
npm install nestjs-redis --save
Now, onto implementing the auth service. Here is is:
import {
  BadRequestException,
  Injectable,
  InternalServerErrorException,
  Logger,
  NotFoundException,
  UnprocessableEntityException,
} from '@nestjs/common';
import { CustomersService } from '../customers/customers.service';
import { CreateCustomerDto } from '../customers/dto/create-customer.dto';
import * as bcrypt from 'bcrypt';
import { PostgresErrorCode } from '../../common/enums/postgres-error-codes.enum';
import { Customer } from '../customers/entities/customer.entity';
import { JwtTokenPayload } from './interfaces/jwt-payload.interface';
import { JwtService } from '@nestjs/jwt';
import * as util from 'util';
import { RedisService } from 'nestjs-redis';
import { Redis } from 'ioredis';
import { ConfigService } from '@nestjs/config';
import * as fs from 'fs';
import { RedisKeys } from '../../common/enums/redis-keys.enum';
@Injectable()
export class AuthService {
  redisClient: Redis;
  payload: JwtTokenPayload;

  constructor(
    private readonly customersService: CustomersService,
    private readonly jwtService: JwtService,
    private readonly redisService: RedisService,
    private readonly configService: ConfigService,
  ) {
    this.redisClient = this.redisService.getClient();
  }

  async register(registrationData: CreateCustomerDto): Promise<Customer> {
    if (registrationData.password !== registrationData.confirmPassword) {
      throw new UnprocessableEntityException('Passwords are not matching.');
    }

    const salt = await bcrypt.genSalt();
    const hashedPassword = await bcrypt.hash(registrationData.password, salt);

    try {
      return await this.customersService.create({
        ...registrationData,
        password: hashedPassword,
      });
    } catch (error) {
      if (error?.code === PostgresErrorCode.UniqueViolation) {
        throw new BadRequestException(
          'Customer with that email already exists',
        );
      }

      Logger.error('[authService] registration error', util.inspect(error));
      throw new InternalServerErrorException(
        'Something went wrong during registration',
      );
    }
  }

  async getAuthenticatedCustomer(
    email: string,
    plainTextPassword: string,
  ): Promise<Customer> {
    try {
      const customer = await this.customersService.getByEmail(email);
      await this.verifyPassword(plainTextPassword, customer.password);
      return customer;
    } catch (error) {
      throw new BadRequestException('Wrong credentials provided');
    }
  }

  private async verifyPassword(
    plainTextPassword: string,
    hashedPassword: string,
  ) {
    const isPasswordMatching = await bcrypt.compare(
      plainTextPassword,
      hashedPassword,
    );
    if (!isPasswordMatching) {
      throw new BadRequestException('Wrong credentials provided');
    }
  }

  async createJwtAccessToken(customer: Customer): Promise<string> {
    this.payload = {
      customerId: customer.id,
    };
    return await this.jwtService.signAsync(this.payload);
  }

  async createJwtRefreshToken(
    customerId: string,
    refreshTokenId: string,
  ): Promise<string> {
    this.payload = {
      customerId: customerId,
    };
    const refreshToken = await this.jwtService.signAsync(this.payload, {
      privateKey: fs
        .readFileSync(
          this.configService.get<string>('JWT_REFRESH_TOKEN_PRIVATE_KEY'),
        )
        .toString(),
      expiresIn: this.configService.get('JWT_REFRESH_TOKEN_EXPIRATION_TIME'),
    });

    // Encrypt the refresh token before storing it in redis
    const salt = await bcrypt.genSalt();
    const hashedRefreshToken = await bcrypt.hash(refreshToken, salt);

    // Save the hashed access token in redis and set it to expire after a day
    const redisResponse = await this.redisClient.setex(
      `${RedisKeys.RefreshToken}:${customerId}:${refreshTokenId}`,
      86400,
      hashedRefreshToken,
    );

    // Return the unencrypted refresh token back to the customer
    if (redisResponse === 'OK') {
      return refreshToken;
    }
  }

  async validateJwtRefreshToken(
    customerId: string,
    refreshToken: string,
    refreshTokenId: string,
  ): Promise<Customer> {
    const customer = await this.customersService.getById(customerId);

    // Fetch the encrypted refresh token from redis
    const savedRefreshToken = await this.redisClient.get(
      `${RedisKeys.RefreshToken}:${customer.id}:${refreshTokenId}`,
    );

    // Compare the received refresh token and  what is stored in redis
    const isRefreshTokenMatching = await bcrypt.compare(
      refreshToken,
      savedRefreshToken,
    );

    if (!isRefreshTokenMatching) {
      throw new BadRequestException('The refresh tokens do not match');
    }

    if (savedRefreshToken) {
      return customer;
    } else {
      throw new NotFoundException('The refresh token was not found');
    }
  }

  async removeJwtRefreshToken(
    customerId: string,
    refreshTokenId: string,
  ): Promise<Customer> {
    const customer = await this.customersService.getById(customerId);

    // Delete the encrypted refresh token from redis
    const deletedResult = await this.redisClient.del(
      `${RedisKeys.RefreshToken}:${customer.id}:${refreshTokenId}`,
    );

    if (deletedResult === 1) {
      return customer;
    } else {
      throw new NotFoundException('The refresh token was not found');
    }
  }
}
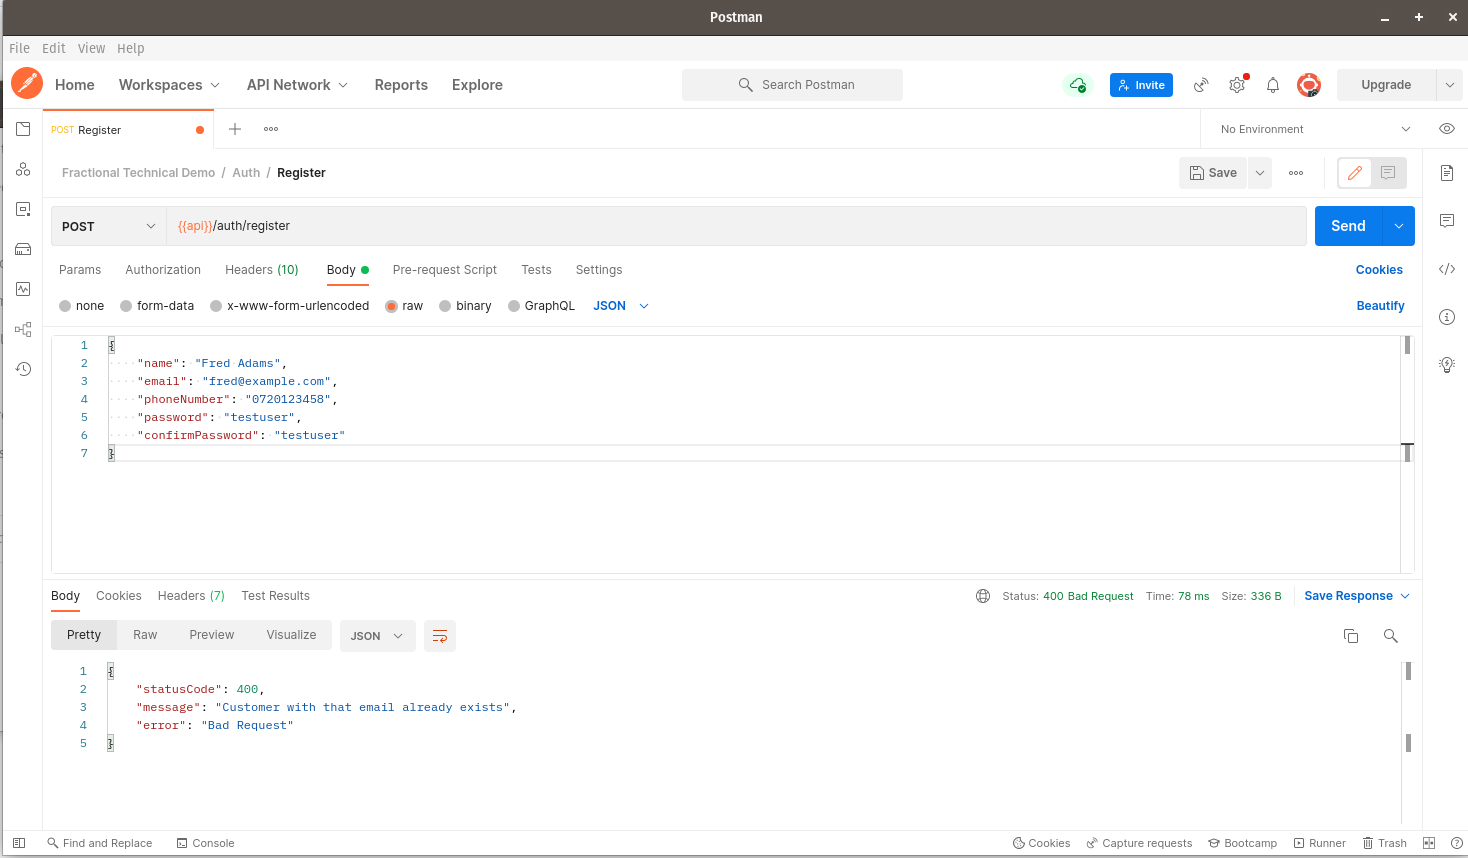
The register method handles customer registration by first doing a password validation, then uses the bcrypt library to encrypt the customers password just before saving it together with all the other customer details. Since we have enforced a uniqueness constraint on our customer table, we want the method to throw a bad request exception if a customer attempts to register twice with the same email.
Customer logins are handled by the getAuthenticatedCustomer method, which calls the verifyPassword method to verify if the customer’s supplied password matches what is saved in the database, as well as the getByEmail method in the customers service that checks if a customer’s supplied email matches what is saved in the database. The createJwtAccessToken method creates the customer’s access token that an authenticated customer uses to access protected routes. The createJwtRefreshToken method creates the refresh token that is used to fetch a new access token once the previous one in use expires. Using the redis client, we explicity tell redis to store the refresh token for 86,400 seconds or 24 hours once it has been created an returned to the customer via a cookie. For security reasons, we encrypt the generated refresh tokens using bcrypt before saving them on redis, to prevent their misuse by unauthorized users, and also since refresh tokens are private data only meant for the customer.
We use the validateJwtRefreshToken method to validate the refresh token received from the cookie. To do so, we must first validate the customer’s ID, which we also fetch from the cookie, then if the customer exists on our backend, we reconstruct a redis key denoted by string: ${RedisKeys.RefreshToken}:${customer.id}:${refreshTokenId}. We use this key to fetch the encrypted access token, then use bcrypt once again to compare the encrypted refresh token with the refresh token that has been received from the cookie. At this point, if the tokens don’t match we throw a bad request exception (http 400 error), otherwise we return a customer object.
Lastly, the removeJwtRefreshToken removes the refresh token from redis, and is called as soon as a customer logs out from our application.
I have also included an enum for storing the names of redis keys that the auth service will be using:
export enum RedisKeys {
  RefreshToken = 'refresh-token',
}
And another for storing the postgres error code:
export enum PostgresErrorCode {
  UniqueViolation = '23505',
}
Auth Controller
Here is our auth controller with the register, login, logOut and refreshToken methods, that call the services that we defined above.
import {
  Body,
  Controller,
  Delete,
  Get,
  Post,
  Req,
  Res,
  UseGuards,
} from '@nestjs/common';
import { AuthService } from './auth.service';
import { Response, Request } from 'express';
import { CreateCustomerDto } from '../customers/dto/create-customer.dto';
import { Customer } from '../customers/entities/customer.entity';
import { AuthGuard } from '@nestjs/passport';
import { SecretData } from './interfaces/secret-data.interface';
import { RefreshGuard } from './guards/refresh-auth.guard';
import * as uuid from 'uuid';
import { JwtAuthGuard } from './guards/jwt-auth.guard';
import { CookieNames } from '../../common/enums/cookie-names.enum';

@Controller('auth')
export class AuthController {
  constructor(private readonly authService: AuthService) {}

  @Post('login')
  @UseGuards(AuthGuard('local'))
  async login(@Req() req: Request, @Res({ passthrough: true }) res: Response) {
    const customer = req.user as Customer;
    const refreshTokenId = uuid.v4();
    const jwtToken = await this.authService.createJwtAccessToken(customer);
    const refreshToken = await this.authService.createJwtRefreshToken(
      customer.id,
      refreshTokenId,
    );

    const secretData: SecretData = {
      jwtAccessToken: jwtToken,
      jwtRefreshToken: refreshToken,
      refreshTokenId: refreshTokenId,
    };

    res.cookie(CookieNames.AuthCookie, secretData, {
      httpOnly: true,
      signed: true,
    });
    return { msg: 'success' };
  }

  @Get('refresh_token')
  @UseGuards(RefreshGuard)
  async refreshToken(
    @Req() req: Request,
    @Res({ passthrough: true }) res: Response,
  ) {
    const customer = req.user as Customer;

    const jwtToken = await this.authService.createJwtAccessToken(customer);

    const refreshTokenId = uuid.v4();
    const refreshToken = await this.authService.createJwtRefreshToken(
      customer.id,
      refreshTokenId,
    );

    const secretData: SecretData = {
      jwtAccessToken: jwtToken,
      jwtRefreshToken: refreshToken,
      refreshTokenId: refreshTokenId,
    };

    res.cookie(CookieNames.RefreshCookie, secretData, {
      httpOnly: true,
      signed: true,
    });
    return { msg: 'success' };
  }

  @Post('register')
  async register(
    @Body() registrationData: CreateCustomerDto,
  ): Promise<Customer> {
    return await this.authService.register(registrationData);
  }

  @Delete('log_out')
  @UseGuards(JwtAuthGuard)
  async logOut(@Req() req: Request, @Res() res: Response) {
    const customer = req.user as Customer;
    const tokenData: SecretData = req.signedCookies[CookieNames.AuthCookie];

    // Remove refresh token from redis
    await this.authService.removeJwtRefreshToken(
      customer.id,
      tokenData.refreshTokenId,
    );
    // Delete auth cookie and refresh cookie
    res.clearCookie(CookieNames.AuthCookie, { signed: true, httpOnly: true });
    res.clearCookie(CookieNames.RefreshCookie, {
      signed: true,
      httpOnly: true,
    });
    res.send({ msg: 'success' }).end();
  }
}
We pass to our login method the decorator:
@UseGuards(AuthGuard('local'))
This tells our login method to use our local strategy that we defined earlier, and to restrict our login route via that strategy. Since we want to direct our response object to set cookies, we will need to pass the passthrough parameter like so:
@Res({ passthrough: true })
We are also using the library-specific method for handling requests and responses, so don’t forget to import their corresponding libraries from the express framework:
import { Response, Request } from 'express';
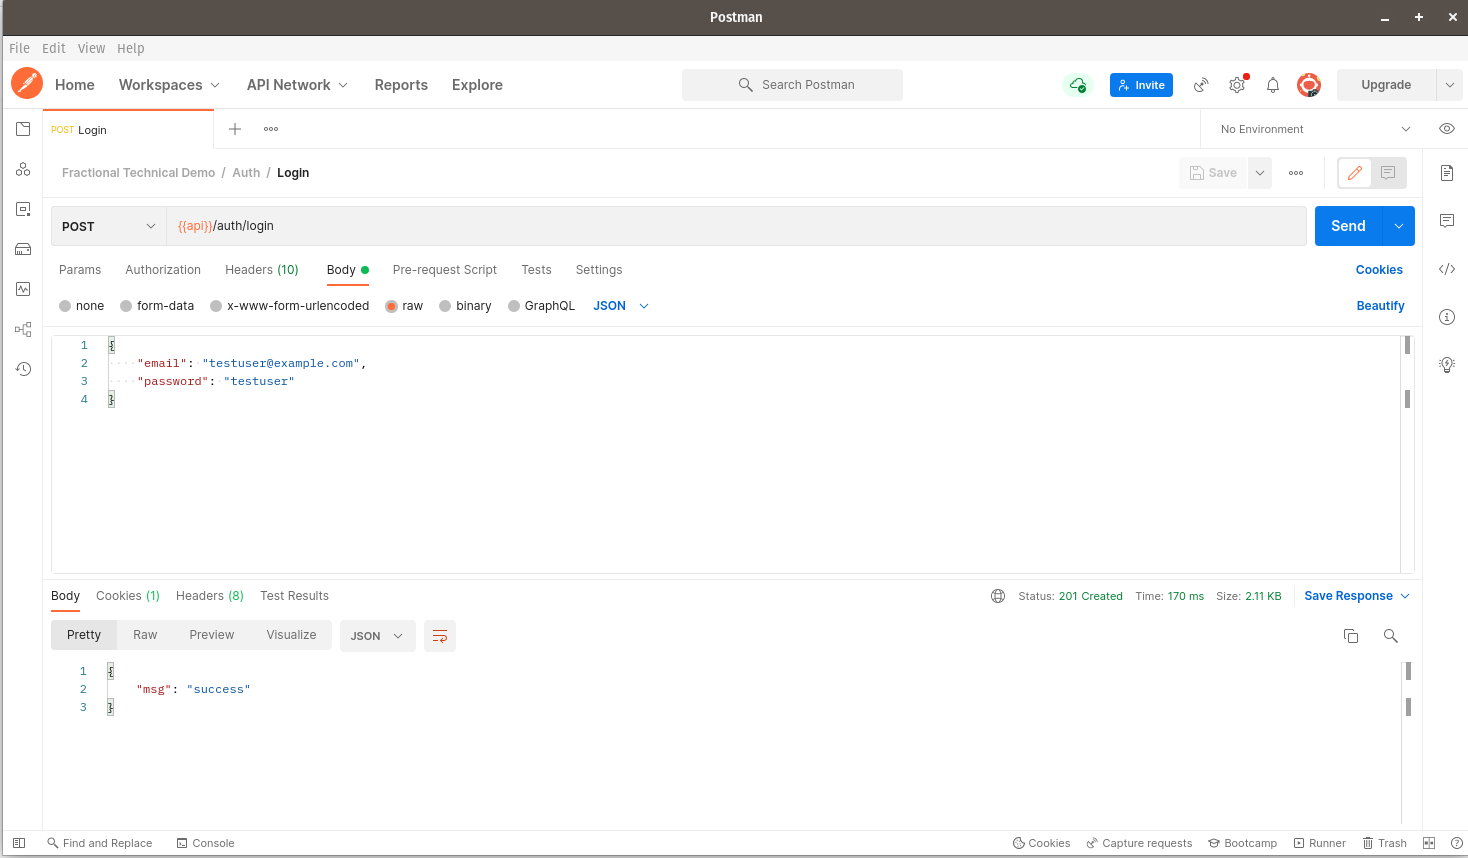
Next, we fetch the customer details via the request object, and proceed to create both our JWT access and refresh tokens. We store these tokens in a cookie called auth-cookie, which we send back in the response, together with a success message.
The refreshToken method is protected via the refresh guard in the line:
@UseGuards(RefreshGuard)
Meaning, only a customer with a valid refresh token can access it. In a similar fashion to the login method, it fetches the customer information via the request object, then generates a fresh JWT access and refresh token which are stored in a cookie named refresh-cookie, which is sent back in the response to the customer along with a success message.
The register method calls the similarly named method in the auth service in order to register our customer, while the logOut method logs out our customer by first removing the JWT refresh token from redis, then deleting the auth-cookie and refresh-cookie.
The cookie names enum:
export enum CookieNames {
  AuthCookie = 'auth-cookie',
  RefreshCookie = 'refresh-cookie',
}
Unit Tests
As is common in modern software development, it is a good idea to include tests with the functionality that we have just built. These tests have the main purpose of verifying the correctness of our logic, and making it easier to debug issues later on, as well as add new functionality without the worry of introducing breaking changes. Nest.js supports two types of tests: unit tests and end to end tests. Unit tests usually test functionality contained within a single class, usually a service or controller class, while end to end tests are for testing the functionality of an entire endpoint. We shall include unit tests for both our controller and service, as shown below. Later on, we will also include end to end tests for the controller as well.
Auth Controller tests:
For now, I have created just a basic initialization check for the controller class, since most of the functionality in the controller class will be tested later on via end to end tests:
import { Test, TestingModule } from '@nestjs/testing';
import { AuthController } from '../auth.controller';
import { AuthService } from '../auth.service';

describe('AuthController', () => {
  let controller: AuthController;

  beforeEach(async () => {
    const module: TestingModule = await Test.createTestingModule({
      controllers: [AuthController],
      providers: [
        {
          provide: AuthService,
          useValue: {},
        },
      ],
    }).compile();

    controller = module.get<AuthController>(AuthController);
  });

  it('should be defined', () => {
    expect(controller).toBeDefined();
  });
});
Auth Service tests:
In the auth service tests, I have tried as much as possible to mock as many dependencies as I could, so as to prevent the calling of actual resources, as well as to make the tests as light as possible and to execute as fast as possible. Behind the scenes, we’re using jest as our testing framework, which comes with Nest.js by default. The describe blocks within the test spec explain pretty much what the given spec is required to do:
import { ConfigService } from '@nestjs/config';
import { JwtService } from '@nestjs/jwt';
import { Test, TestingModule } from '@nestjs/testing';
import { getRepositoryToken } from '@nestjs/typeorm';
import { RedisService } from 'nestjs-redis';
import { CustomersService } from '../../customers/customers.service';
import { Customer } from '../../customers/entities/customer.entity';
import { AuthService } from '../auth.service';
import { JwtTokenPayload } from '../interfaces/jwt-payload.interface';
import * as bcrypt from 'bcrypt';
import { CreateCustomerDto } from '../../customers/dto/create-customer.dto';

describe('AuthService', () => {
  let service: AuthService;
  let customerService: CustomersService;
  const fakeCustomer = new Customer({
    id: '2173dd22-42ed-4091-bb46-aaca401efa45',
    name: 'Test Customer',
    email: 'testcustomer@example.com',
    phoneNumber: '0720123456',
    password: 'strongPassword',
  });
  let bcryptCompare: jest.Mock;

  let customerData: Customer;
  let findCustomer: jest.Mock;

  beforeEach(async () => {
    const getClient = jest.fn((data: any) => {
      return data;
    });

    const signAsync = jest.fn((data: JwtTokenPayload) => {
      return data.customerId;
    });

    const get = jest.fn();

    const mockRedisService = jest.fn().mockImplementation(() => {
      return {
        getClient: getClient,
      };
    });

    const mockJwtService = jest.fn().mockImplementation(() => {
      return {
        signAsync: signAsync,
      };
    });

    const mockConfigService = jest.fn().mockImplementation(() => {
      return {
        get: get,
      };
    });

    const module: TestingModule = await Test.createTestingModule({
      providers: [
        AuthService,
        CustomersService,
        {
          provide: JwtService,
          useClass: mockJwtService,
        },
        {
          provide: RedisService,
          useClass: mockRedisService,
        },
        {
          provide: ConfigService,
          useClass: mockConfigService,
        },
        {
          provide: getRepositoryToken(Customer),
          useValue: {},
        },
      ],
    }).compile();

    service = module.get<AuthService>(AuthService);
    customerService = module.get<CustomersService>(CustomersService);
    bcryptCompare = jest.fn().mockReturnValue(true);
    (bcrypt.compare as jest.Mock) = bcryptCompare;

    customerData = { ...fakeCustomer };
    findCustomer = jest.fn().mockResolvedValue(customerData);
  });

  it('should be defined', () => {
    expect(service).toBeDefined();
  });

  describe('register', () => {
    it('should return the customer details', async () => {
      let customer: Promise<Customer>;
      const registrationData = new CreateCustomerDto();
      jest.spyOn(service, 'register').mockImplementation(() => customer);
      expect(await service.register(registrationData)).toBe(customer);
    });
  });

  describe('when creating a jwt access token', () => {
    it('should return a string', async () => {
      expect(typeof (await service.createJwtAccessToken(fakeCustomer))).toEqual(
        'string',
      );
    });
  });

  describe('when creating a jwt refresh token', () => {
    it('should return a string', async () => {
      let result: Promise<string>;
      const testRefreshTokenId = '2173dd22-42ed-4091-bb46-aaca401efa46';
      jest
        .spyOn(service, 'createJwtRefreshToken')
        .mockImplementation(() => result);
      expect(
        await service.createJwtRefreshToken(
          fakeCustomer.id,
          testRefreshTokenId,
        ),
      ).toBe(result);
    });
  });

  describe('when validating a jwt refresh token', () => {
    it('should return the customer details', async () => {
      let result: Promise<Customer>;
      const testRefreshToken = 'testrefreshtoken';
      const testRefreshTokenId = '2173dd22-42ed-4091-bb46-aaca401efa46';
      jest
        .spyOn(service, 'validateJwtRefreshToken')
        .mockImplementation(() => result);
      expect(
        await service.validateJwtRefreshToken(
          fakeCustomer.id,
          testRefreshToken,
          testRefreshTokenId,
        ),
      ).toBe(result);
    });
  });

  describe('when deleting a jwt refresh token', () => {
    it('should return the customer details', async () => {
      let result: Promise<Customer>;
      const testRefreshTokenId = '2173dd22-42ed-4091-bb46-aaca401efa46';
      jest
        .spyOn(service, 'removeJwtRefreshToken')
        .mockImplementation(() => result);
      expect(
        await service.removeJwtRefreshToken(
          fakeCustomer.id,
          testRefreshTokenId,
        ),
      ).toBe(result);
    });
  });

  describe('when accessing the data of an authenticating customer', () => {
    describe('and the provided password is not valid', () => {
      beforeEach(() => {
        bcryptCompare.mockReturnValue(false);
      });

      it('should throw an error', async () => {
        await expect(
          service.getAuthenticatedCustomer(
            fakeCustomer.email,
            fakeCustomer.password,
          ),
        ).rejects.toThrow();
      });
    });

    describe('and the provided password is valid', () => {
      beforeEach(() => {
        bcryptCompare.mockReturnValue(true);
      });

      describe('and the customer is found in the database', () => {
        beforeEach(() => {
          findCustomer.mockReturnValue(customerData);
        });

        it('should return the customer data', async () => {
          try {
            const customer = await service.getAuthenticatedCustomer(
              fakeCustomer.email,
              fakeCustomer.password,
            );
            expect(customer).toBe(customerData);
          } catch (error) {
            console.log('[authService spec] error', error);
          }
        });
      });

      describe('and the customer is not found in the database', () => {
        beforeEach(() => {
          findCustomer.mockResolvedValue(undefined);
        });

        it('should throw an error', async () => {
          await expect(
            service.getAuthenticatedCustomer(
              fakeCustomer.email,
              fakeCustomer.password,
            ),
          ).rejects.toThrow();
        });
      });
    });

    it('should attempt to get the customer by email', async () => {
      const getByEmailSpy = jest.spyOn(customerService, 'getByEmail');
      try {
        await service.getAuthenticatedCustomer(
          'user@email.com',
          'strongPassword',
        );
      } catch (error) {
        expect(getByEmailSpy).toBeCalledTimes(1);
      }
    });
  });
});
Here’s how the tests should look like when you run them:
Auth Controller:
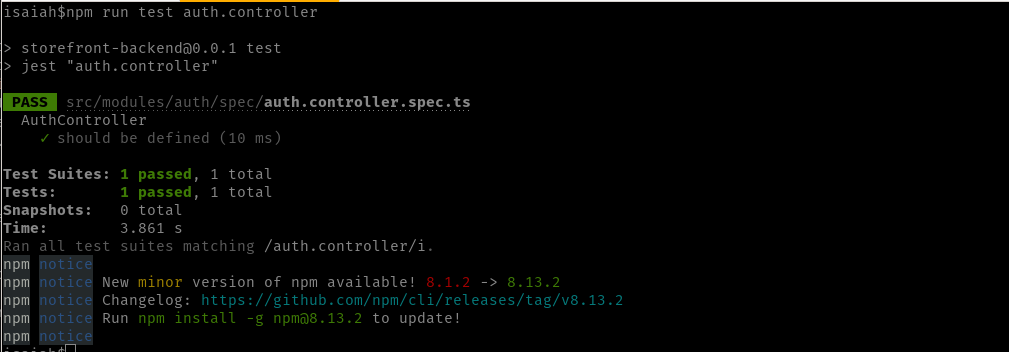
Since it’s only one test case, you should see that only one test has run and passed.
Auth Service:
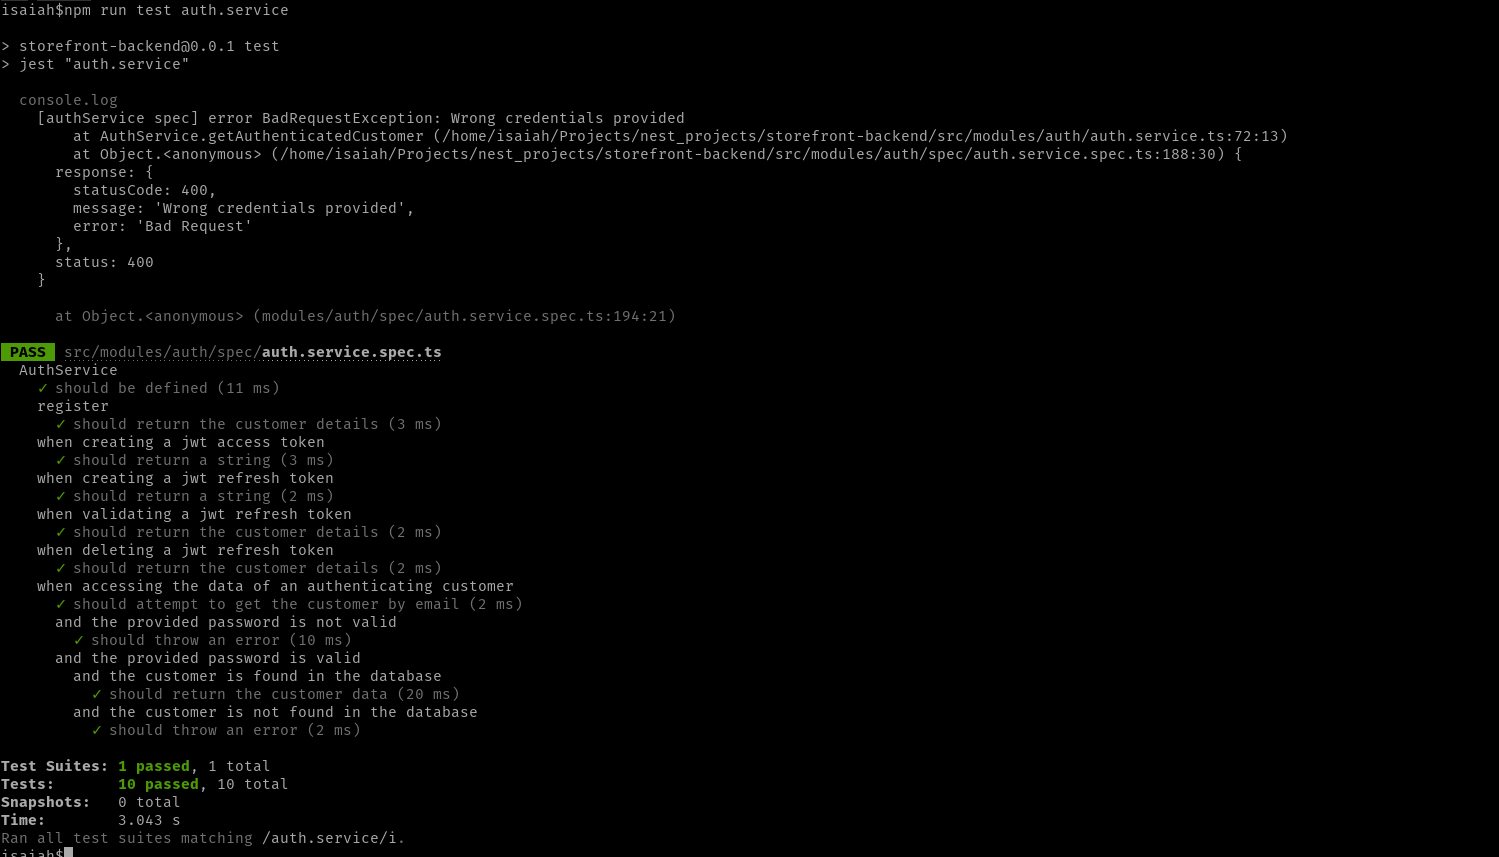
In total, the console should indicate that 10 tests have run and passed. In one of the authentication specs, I have added a console.log line to log the exception thrown when wrong credentials are supplied, but in your case adding this line can be optional.
Postman Tests
For completeness, we can proceed to do actual tests using a REST client such as Postman. You can use any REST client you prefer, but I’ve chosen Postman since it’s the one that I have the most experience in. In case you’re new to using Postman, I’d recommend creating a collection within Postman by first clicking: File > New. This will take you to the Create New screen. Under the Create New screen, choose Collection. Click on the newly created collection, then give it a more memorable name (if you want). Within this collection, click the Variables tab, then add a new variable called api with both an initial and current value of http://localhost:3000 like so:
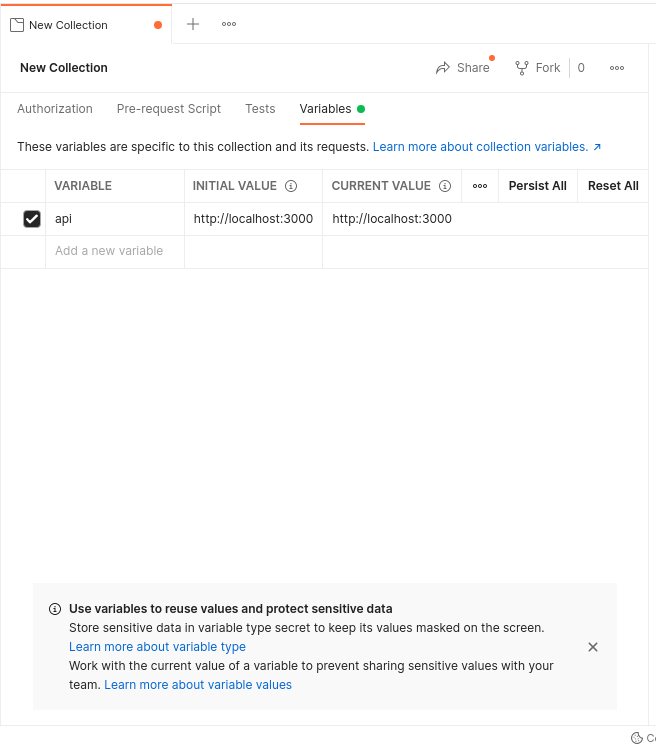
Click Persist All.
You can then proceed to create new requests within this collection by right clicking it then selecting Add Request.
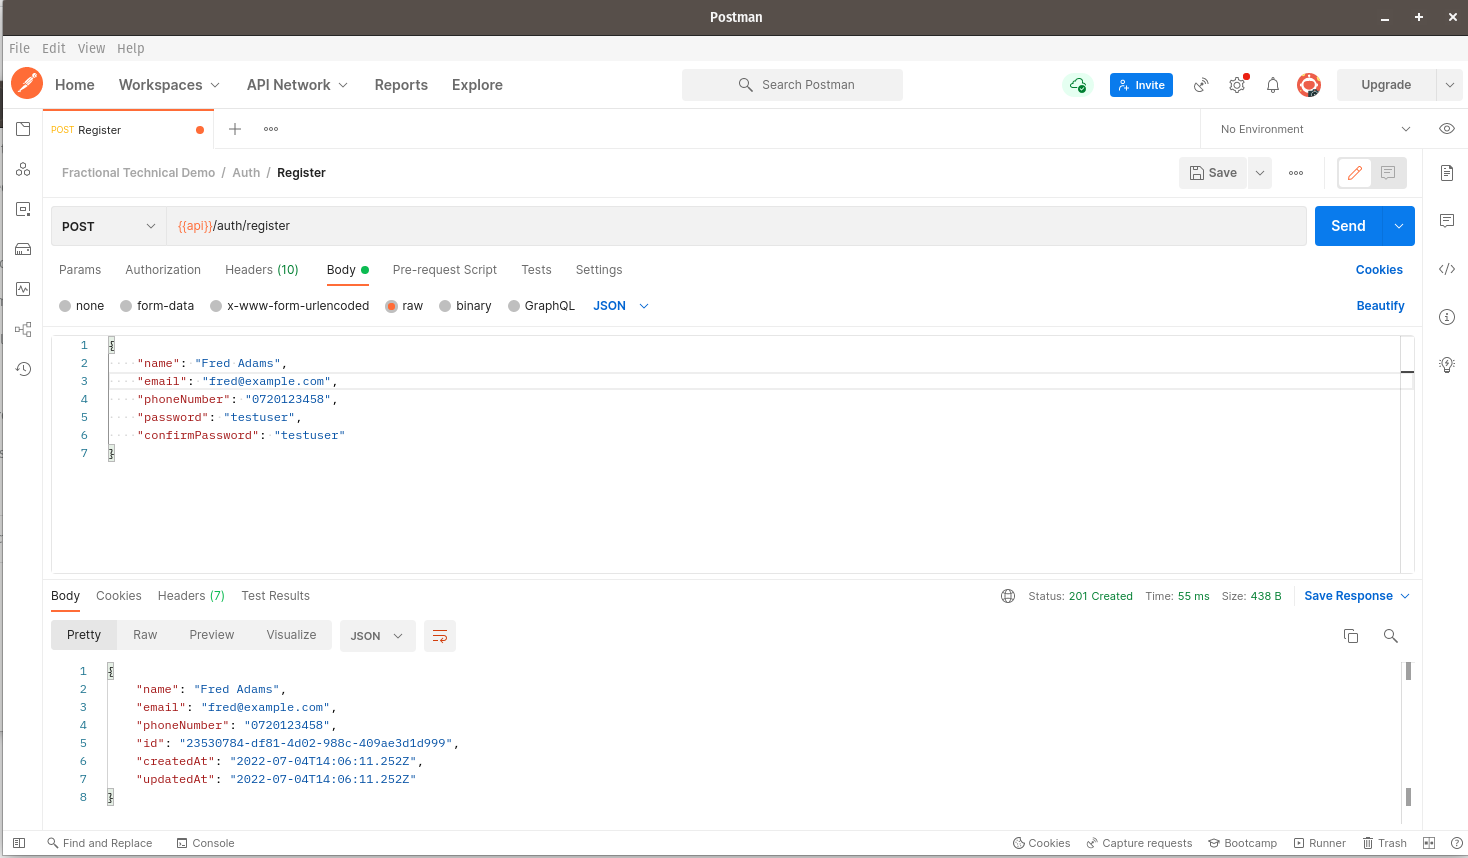
Here are how my tests look like. Kindly observe the contents of both the request and response bodies:
Registration:
Registering a customer with a duplicate email/phone number:
In order to test the entire authentication flow via Postman, we start by logging in using our customer credentials:
Click on Cookies to the right of the Postman window. You should see the following screen:
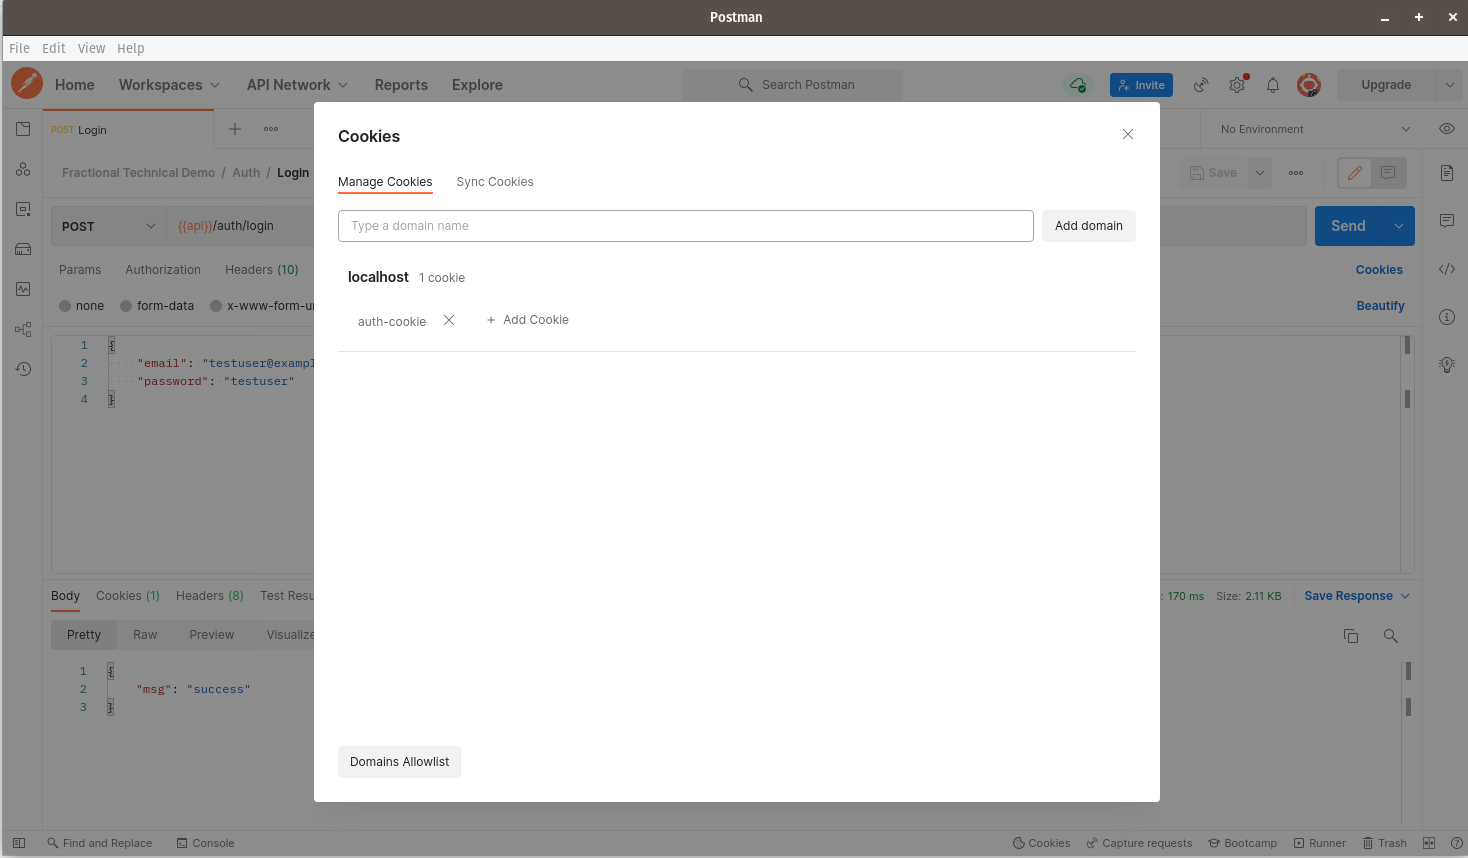
An auth-cookie has been sent to Postman after logging in. Click on auth-cookie. You should see the following screen:
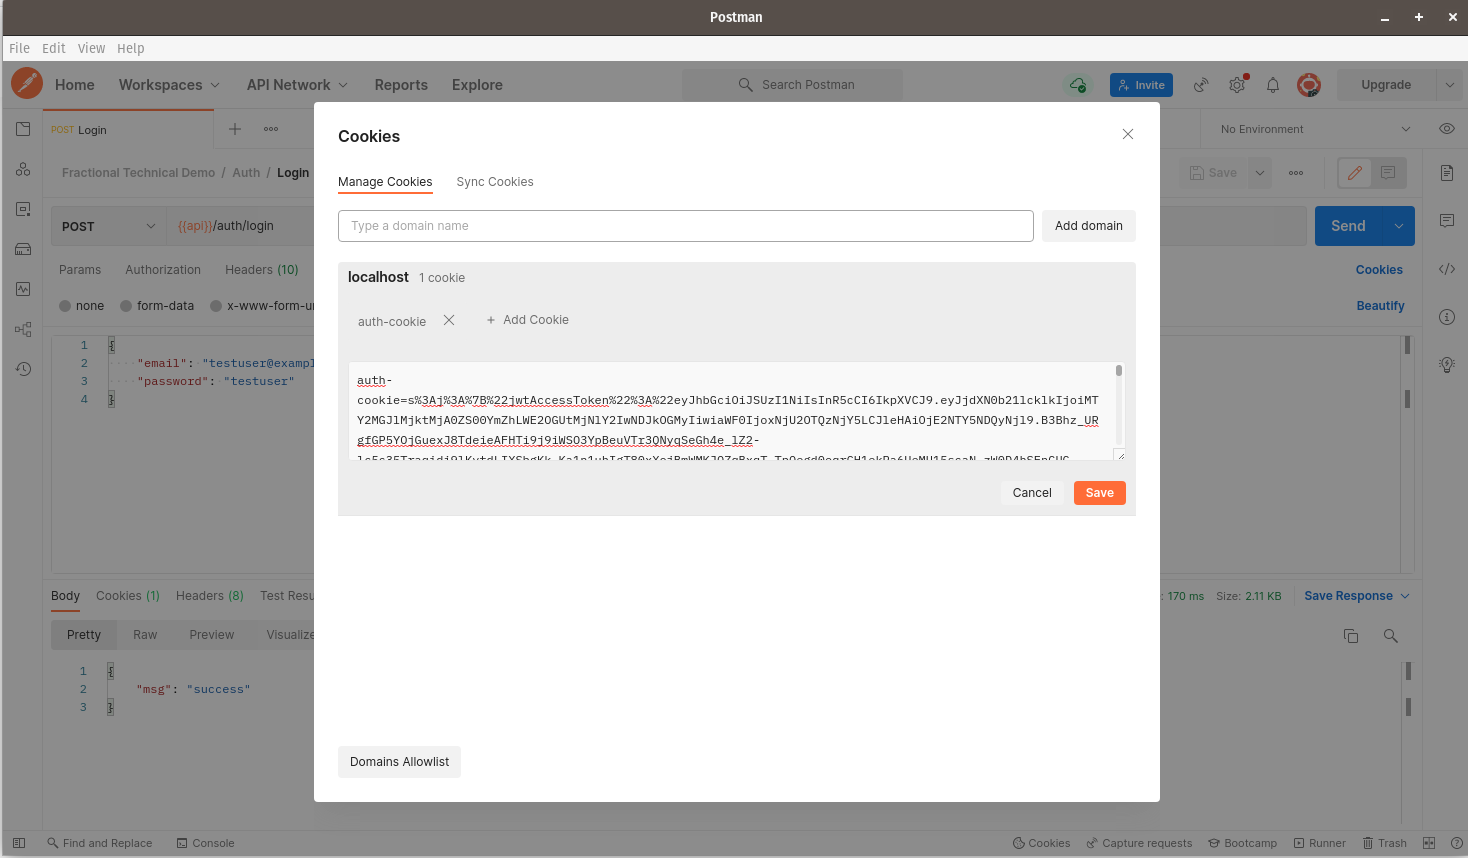
Click Save. The cookie should now be saved within the client, and will be sent back to the server with every subsequent request we make. You should now see the following:
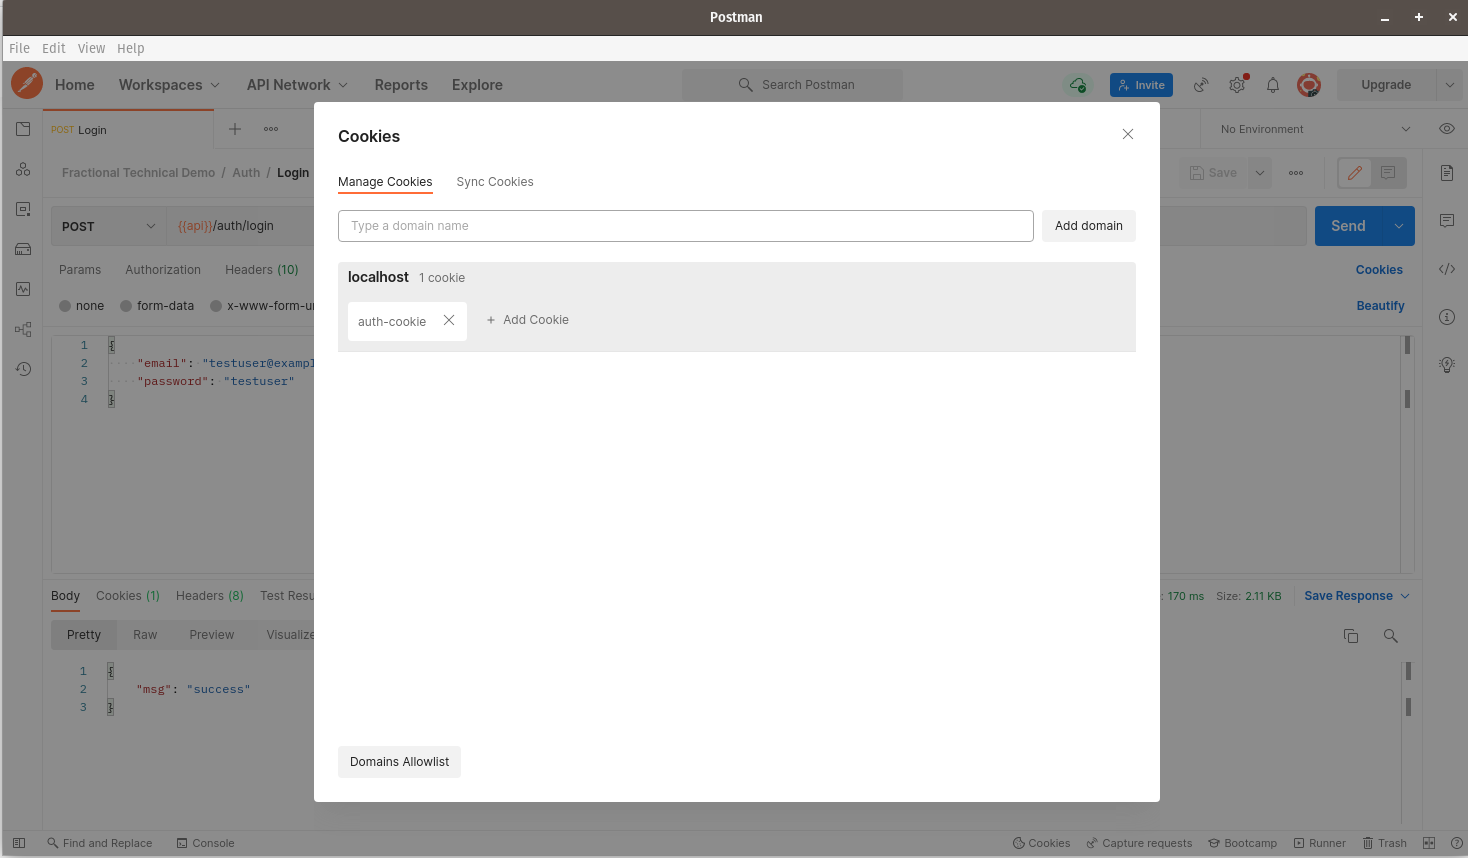
You can now proceed to close the Cookies window.
Here are the tests for our refresh token endpoint. Make sure you have first logged in as a customer with valid credentials:
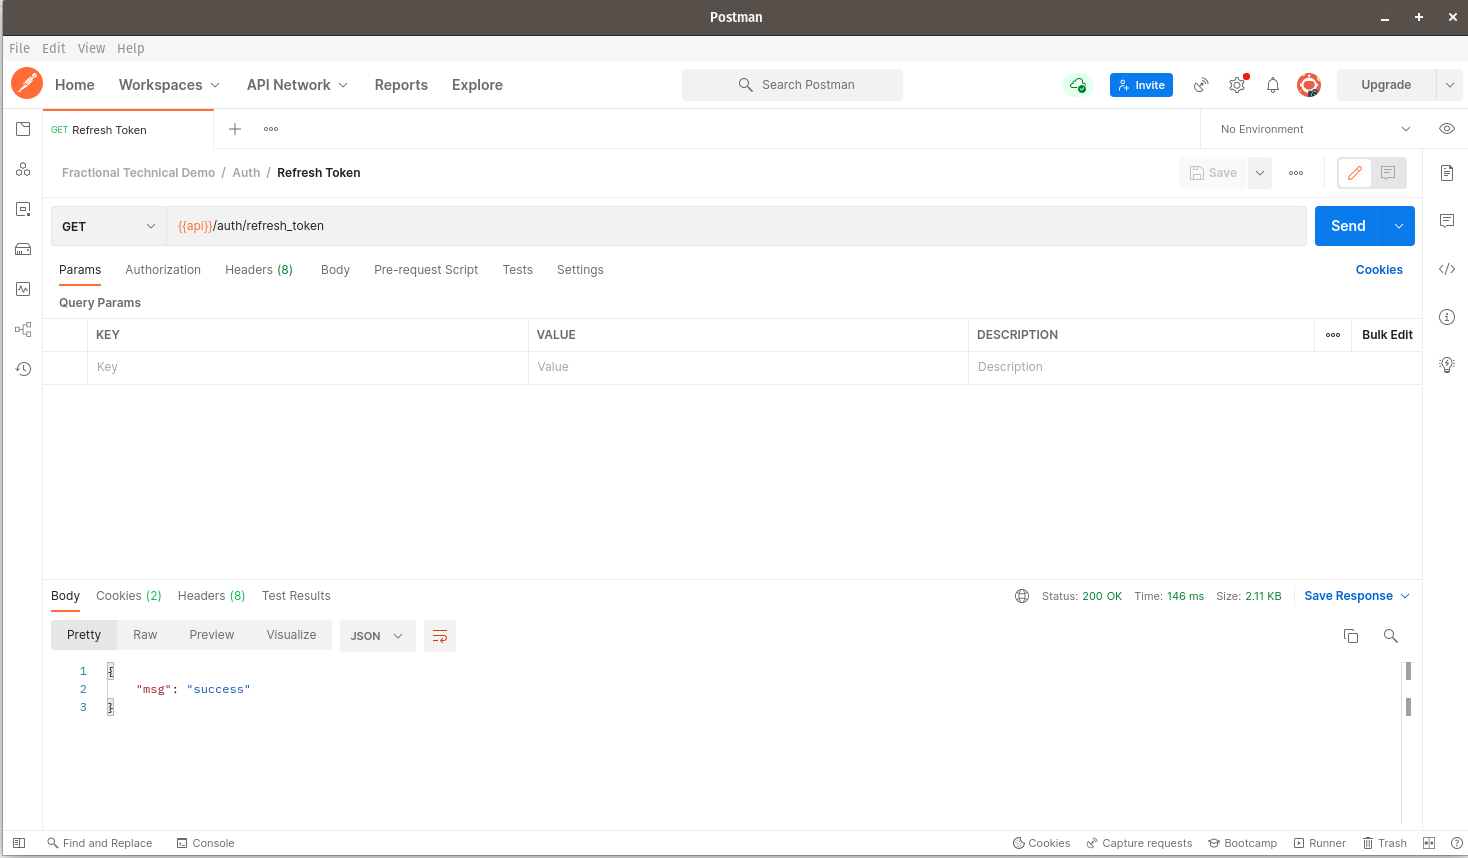
If you click on the Cookies tab at the bottom, you should see that two cookies have been returned in the response: auth-cookie and refresh-cookie. Let us proceed to test if our refresh-cookie works well.
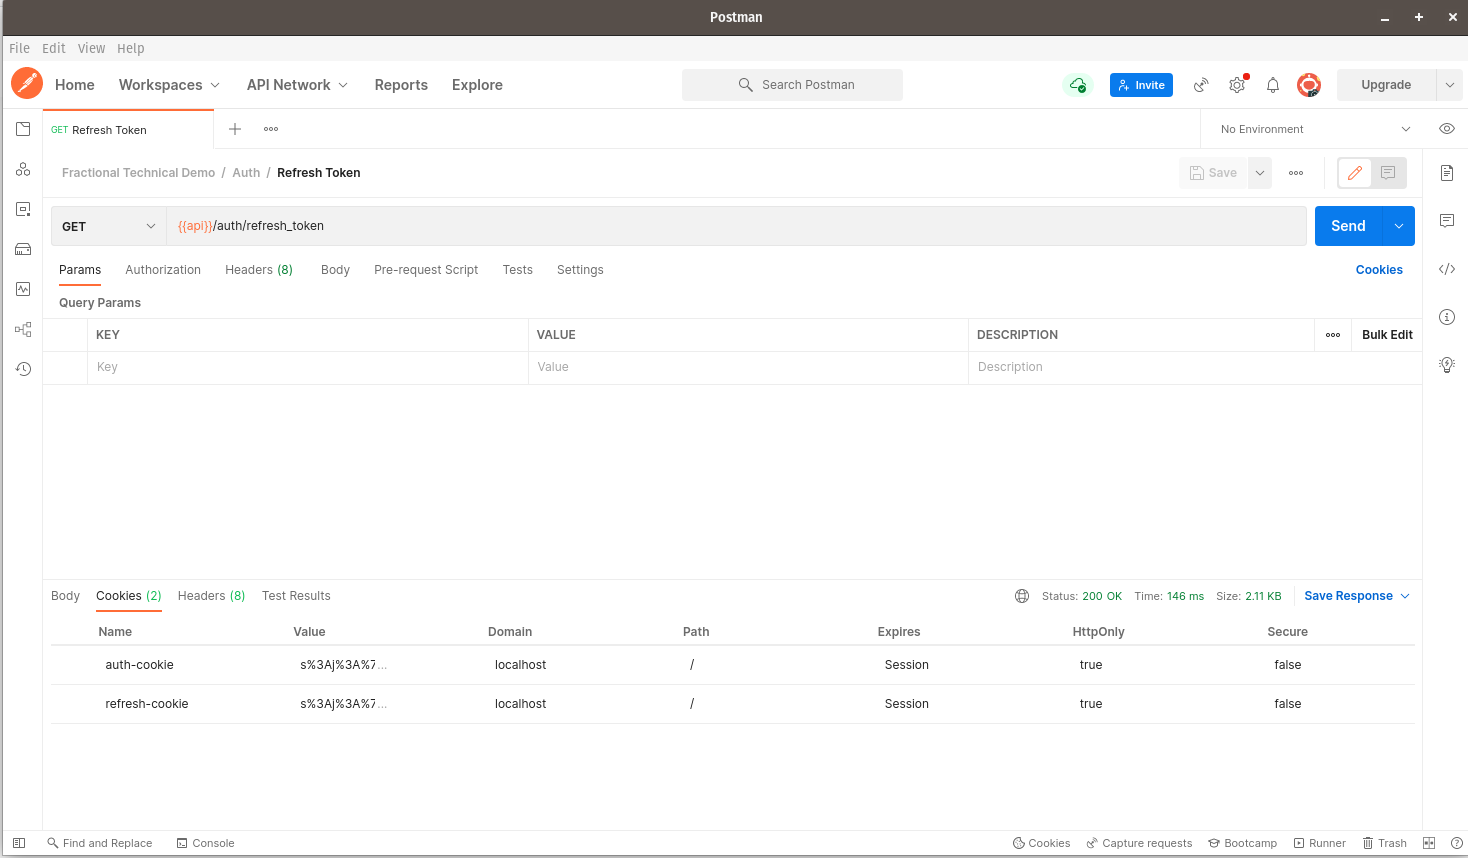
Click on the Cookies link to the right of Postman and you should see the screen below. The Manage Cookies dialog should now appear.
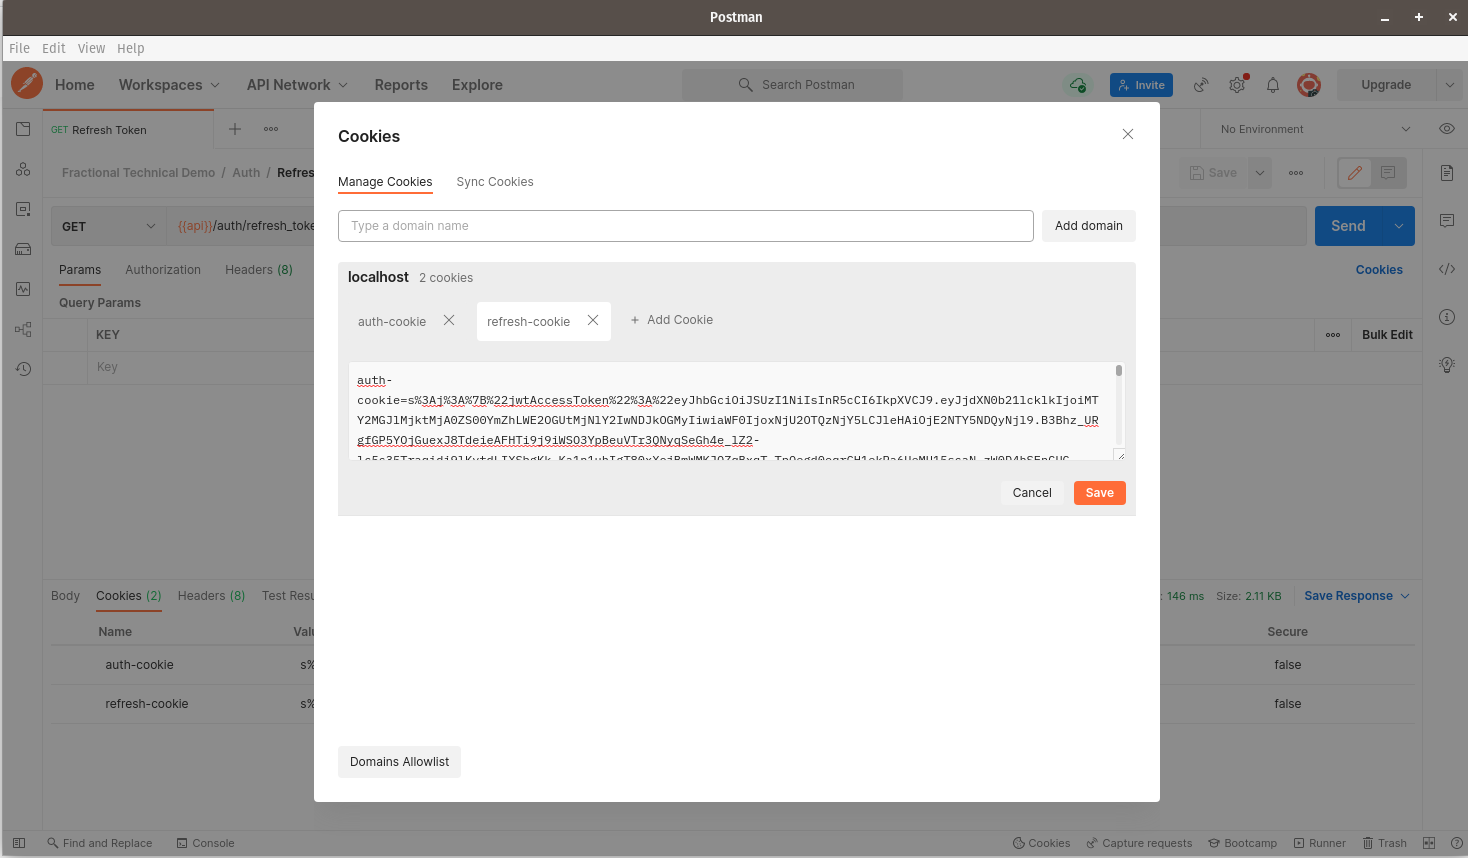
Click on the refresh-cookie that we received, then click Save.
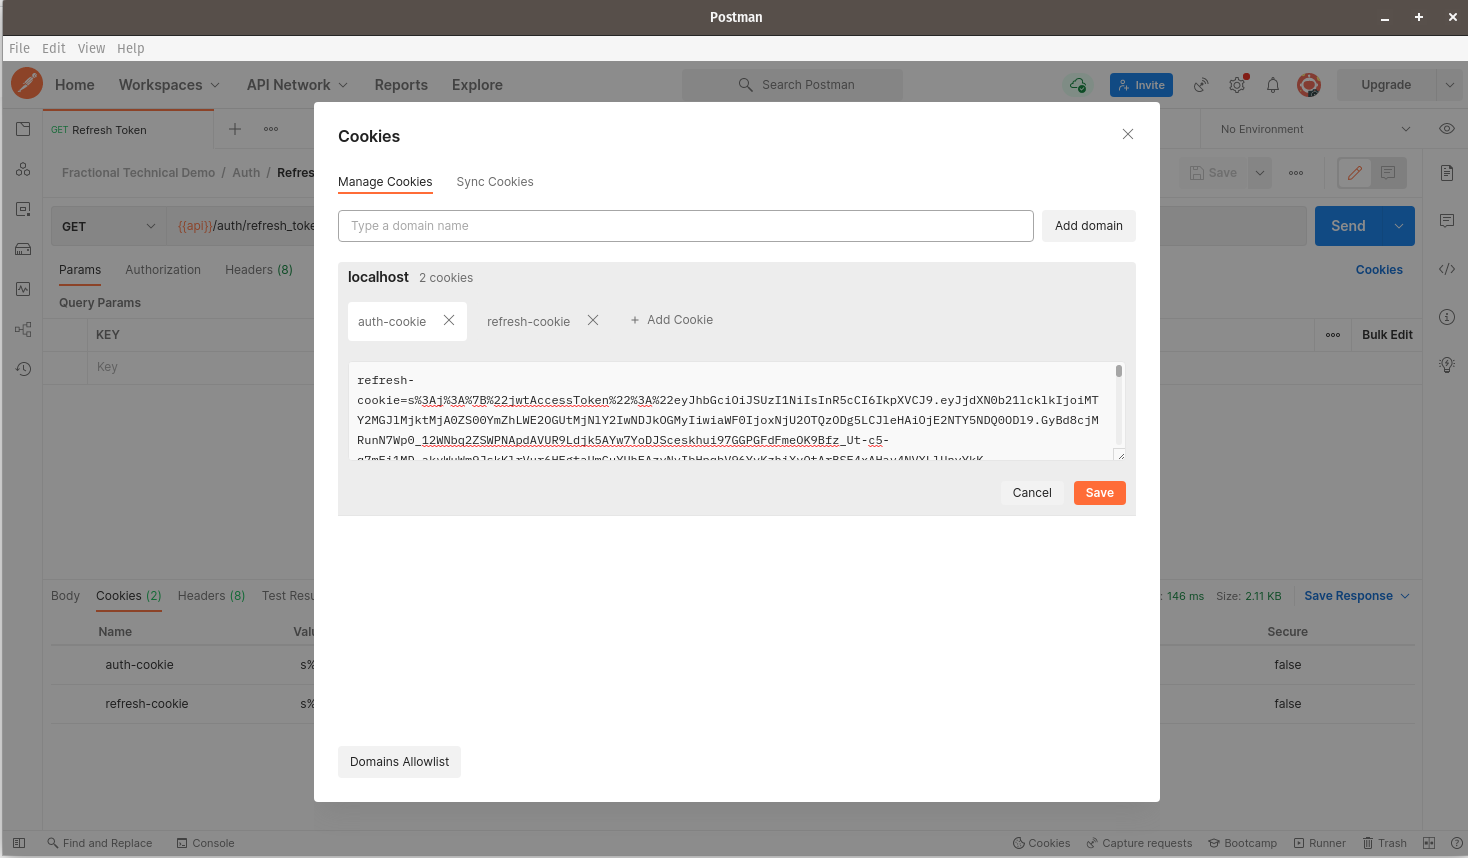
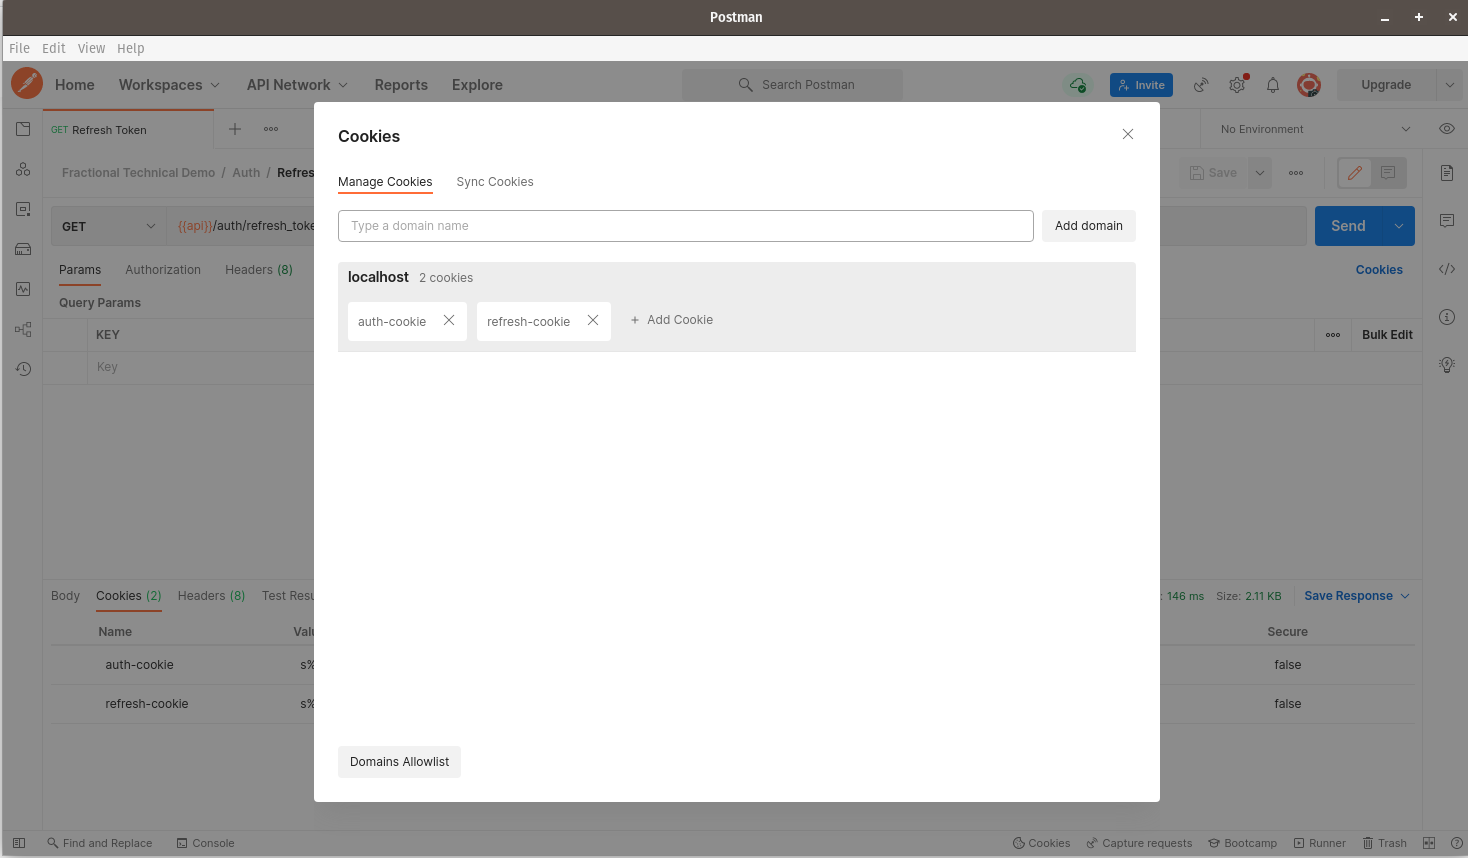
The refresh-cookie should now be saved on Postman as shown below:
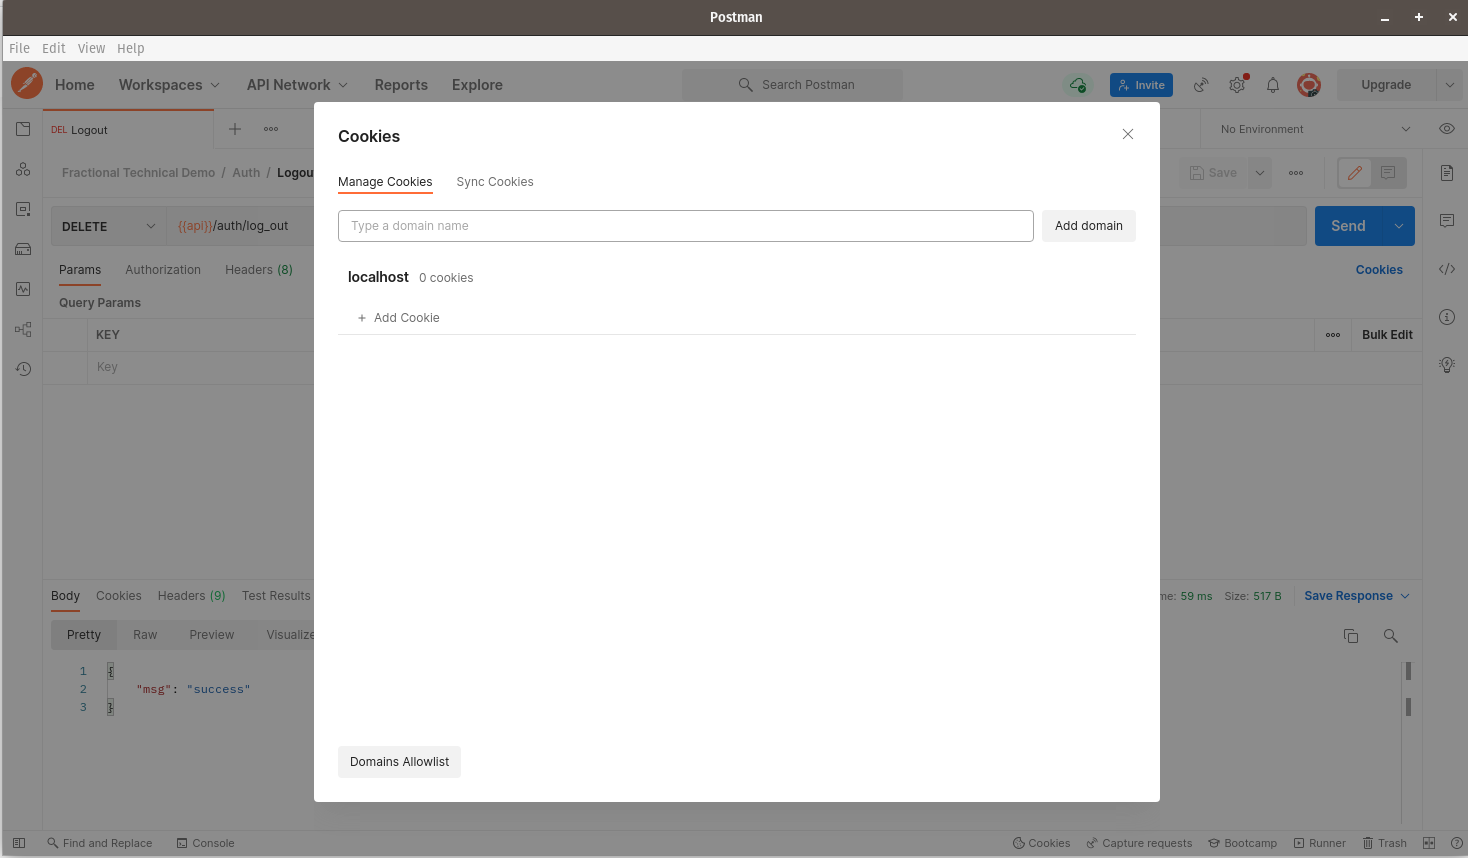
Finally, let us test if our log out endpoint is sound. We’ll start by navigating to our logout endpoint via postman and submitting the request - note, it’s a DELETE request:
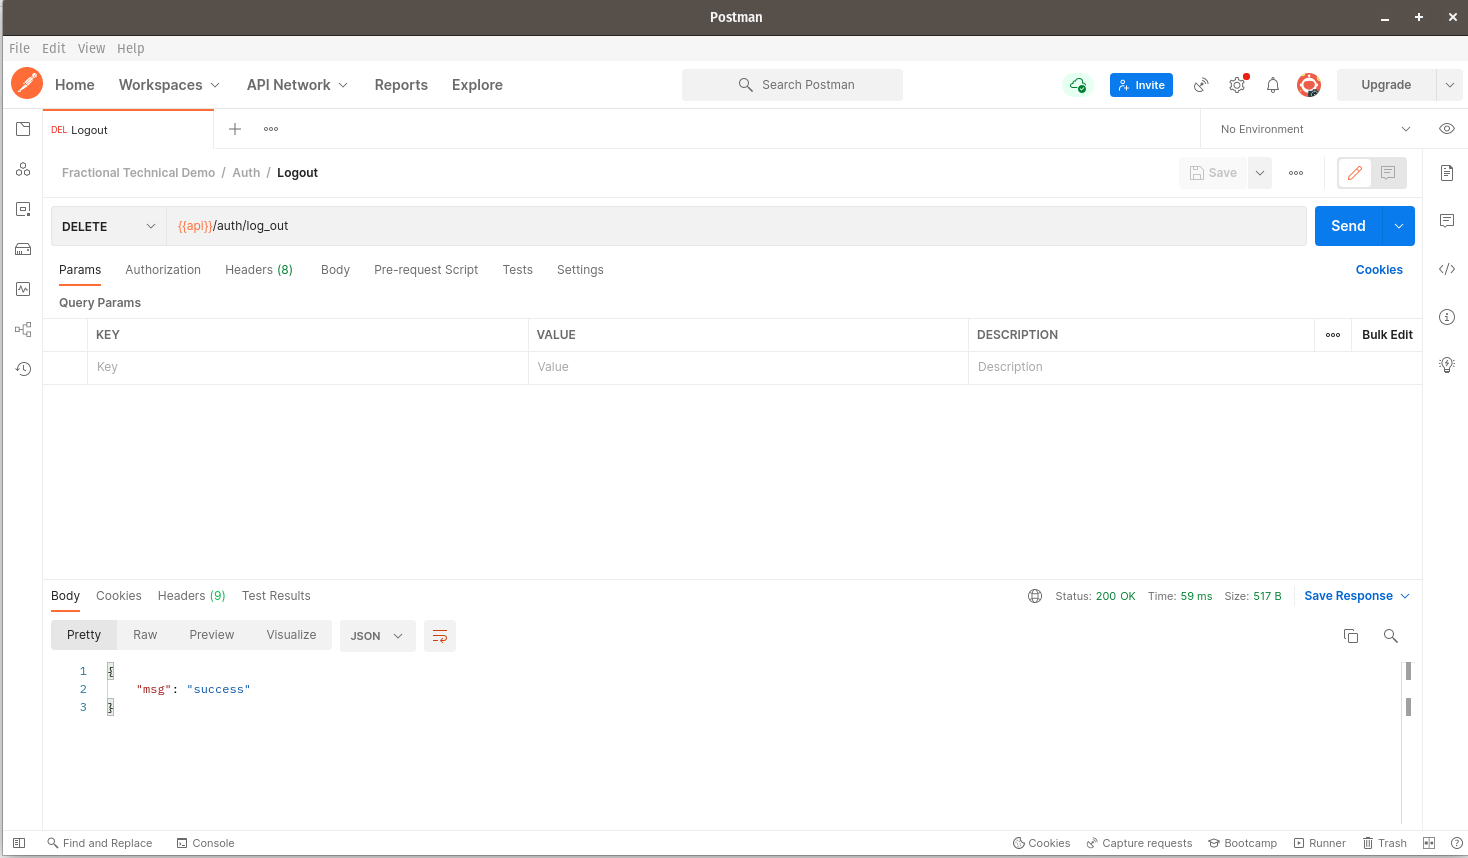
We should receive a success message in the response body. If we click the Cookies link to the right of the screen, we should note that all the cookies that were previously saved on Postman have now been deleted:
We’re now done with our Postman tests. Kindly comment on any feedback that you might have.
References
- Authentication flow sequence diagrams:
- Nest.js Documentation: https://docs.nestjs.com